# Self-Hosted Comments for Astro: Why I Switched to Artalk
Add Artalk comments to an Astro blog with Docker and a reusable component. Why I moved from Isso, plus resource usage and an admin login trap.
Author: Ruhani Rabin
Canonical: https://rabin.blog/astro-artalk-self-hosted-comments/
Published: 2026-11-12T17:14:00.000Z
I wanted one place to manage comments across my sites. Isso was already running on rabin.blog, but managing several sites with it felt awkward. I also had Remark42 on my digital garden. Its admin controls work inside the comment widget, but I wanted a central dashboard where I could browse comments and settings without opening individual pages.
That brought me to [Artalk](https://artalk.js.org/). I can now manage multiple sites from its dashboard, and the server was small enough that trying it didn’t need much planning. I had only a few comments to move. Probably the right time to do this.
I still use Remark42 on the garden. My [Quartz 5 and Remark42 setup](https://rabin.blog/build-quartz-5-digital-garden-with-comments-analytics-and-upgrade-boundaries/) covers that integration. This change was about how I wanted to manage rabin.blog. But I might find a way to replace that as well. *Not decided yet.*
## TL;DR
* Run Artalk with Docker and a persistent data volume.
* Give it an HTTPS hostname, then allow your blog’s origin in the site settings.
* Add one Astro component with a stable page path for each comment thread.
* Use the exact administrator nickname and email when signing in.
## What it used on my server
These were readings from my own containers, taken during ordinary use:
| Comment system | RAM | CPU |
| -------------- | --------------- | ---------- |
| Isso | 286 MB | 1.3% |
| Remark42 | 78 MB | 0.5% |
| Artalk | Less than 15 MB | About 0.1% |
Artalk was around **10 MB** even with its admin panel open. These aren’t matched-load benchmarks. The versions, traffic and settings differ, so don’t treat the table as a performance ranking. It told me Artalk was comfortably small for my VPS.
I also checked what the browser downloads. The deployed Artalk JavaScript was 200,645 bytes, or about **59.4 KiB with local gzip compression**. Remark42’s application and embed loader together came to about **75.6 KiB gzipped**.
Including CSS, Artalk was about **66.1 KiB**. Remark42’s loader, application, CSS and iframe HTML totaled about **84.1 KiB**. Those are compressed-size estimates from the files I downloaded. Browser transfer sizes might be different. They exclude avatars, API responses and optional features. I disabled Artalk’s emoji picker to avoid another external pack request.
## 1. Run Artalk with Docker
**Note**: Note
At this point I would assume you need Docker Compose on your VPS and an existing reverse proxy that can provide HTTPS.
The examples use `comments.rabin.blog` for Artalk and `rabin.blog` for the blog.
Create `compose.yml` in a new directory on the VPS:
compose.yml
```yaml
services:
artalk:
image: artalk/artalk-go:2.10.1
restart: unless-stopped
ports:
- "127.0.0.1:8080:23366"
environment:
TZ: Asia/Kuala_Lumpur
ATK_LOCALE: en
ATK_SITE_DEFAULT: My Blog
ATK_SITE_URL: https://rabin.blog
volumes:
- artalk-data:/data
volumes:
artalk-data:
```
This is the version I used. SQLite and configuration live in the volume, so you don’t need a separate database container. Change the timezone for your location and choose another host port if `8080` is already occupied.
Start it and create your administrator:
```bash
docker compose up -d
docker compose exec artalk artalk admin
```
Run these from the directory containing `compose.yml`. The `exec artalk` command asks for your administrator details. Keep the nickname as well as the email. Both will be essential later.
> Point your reverse proxy at `http://127.0.0.1:8080` and serve it as `https://comments.rabin.blog`. That address works for a proxy running on the VPS host. If your proxy is another container, put it on a shared Docker network and route to `artalk:23366` instead. Its own `127.0.0.1` points back to itself.
Open the Artalk hostname. You should reach its dashboard. The [official deployment guide](https://artalk.js.org/en/guide/deploy.html) covers other installation layouts.
## 2. Allow the blog to connect
In Artalk’s site management, keep the site name as `My Blog` (or your blog name) and add your production origin to its trusted domains:
```text
https://rabin.blog
```
For local testing, also allow the exact origin your Astro server uses, such as `http://localhost:4321`. `localhost` and `127.0.0.1` are different origins. **Missing this setting gave me a CORS error before the widget could read comments**.
You can add more sites in the same dashboard. Each gets its own site name and allowed origins. The frontend must use the matching name in its `site` setting.
## 3. Add a reusable Astro component
Create `src/components/Comments.astro`. This example uses Artalk’s own JS and CSS served by your container, so there’s no frontend package to install.
src/components/Comments.astro
```astro
---
const { title } = Astro.props;
const pageKey = Astro.url.pathname;
---
Comments
```
Replace the Artalk hostname in all three places. The theme lines assume your site sets `data-theme="dark"` or `data-theme="light"` on its root HTML element, as mine does. Adapt that part to your theme switcher. For a site that follows only the device theme, use `darkMode: "auto"` and remove the observer.
In your existing article layout, add the import and render the component after the article body:
src/layouts/PostLayout.astro — add to your existing layout
```astro
---
import Comments from "../components/Comments.astro";
// Keep your existing layout code and title value.
---
```
Use the title variable your layout already has. Render the component once per page. If your content has a `comments` flag, use that to identify where it appears.
`pageKey` is the thread identifier. Keeping `/my-article/` unchanged means the comments will be identified by that article when you change a theme or move the backend. Be consistent about trailing slashes. Imported comments must use the same keys. See Artalk’s [frontend configuration](https://artalk.js.org/en/guide/frontend/config.html) for the options.
This example assumes normal page loads. If you use Astro’s `ClientRouter`, add initialization and cleanup around its navigation lifecycle before using this component across client-side page changes.
## 4. Test as a reader, then as the administrator
Open an article in a private window and submit a test comment. Check it in the dashboard, approve it, then reply. Try this on a phone-sized screen and in both themes before replacing your old widget.
For administrator access, enter the **exact nickname and email from the admin account**. Artalk should ask for your password and show the admin controls. I initially used the right email with a different nickname and created another commenter. Changing the nickname to match fixed it.
**Configure SMTP in the dashboard if you want email notifications**. Mine worked in a real comment test. I also hold new comments for moderation. Update your privacy page for the new service, including browser storage and any avatar service you enable.
## Moving existing comments
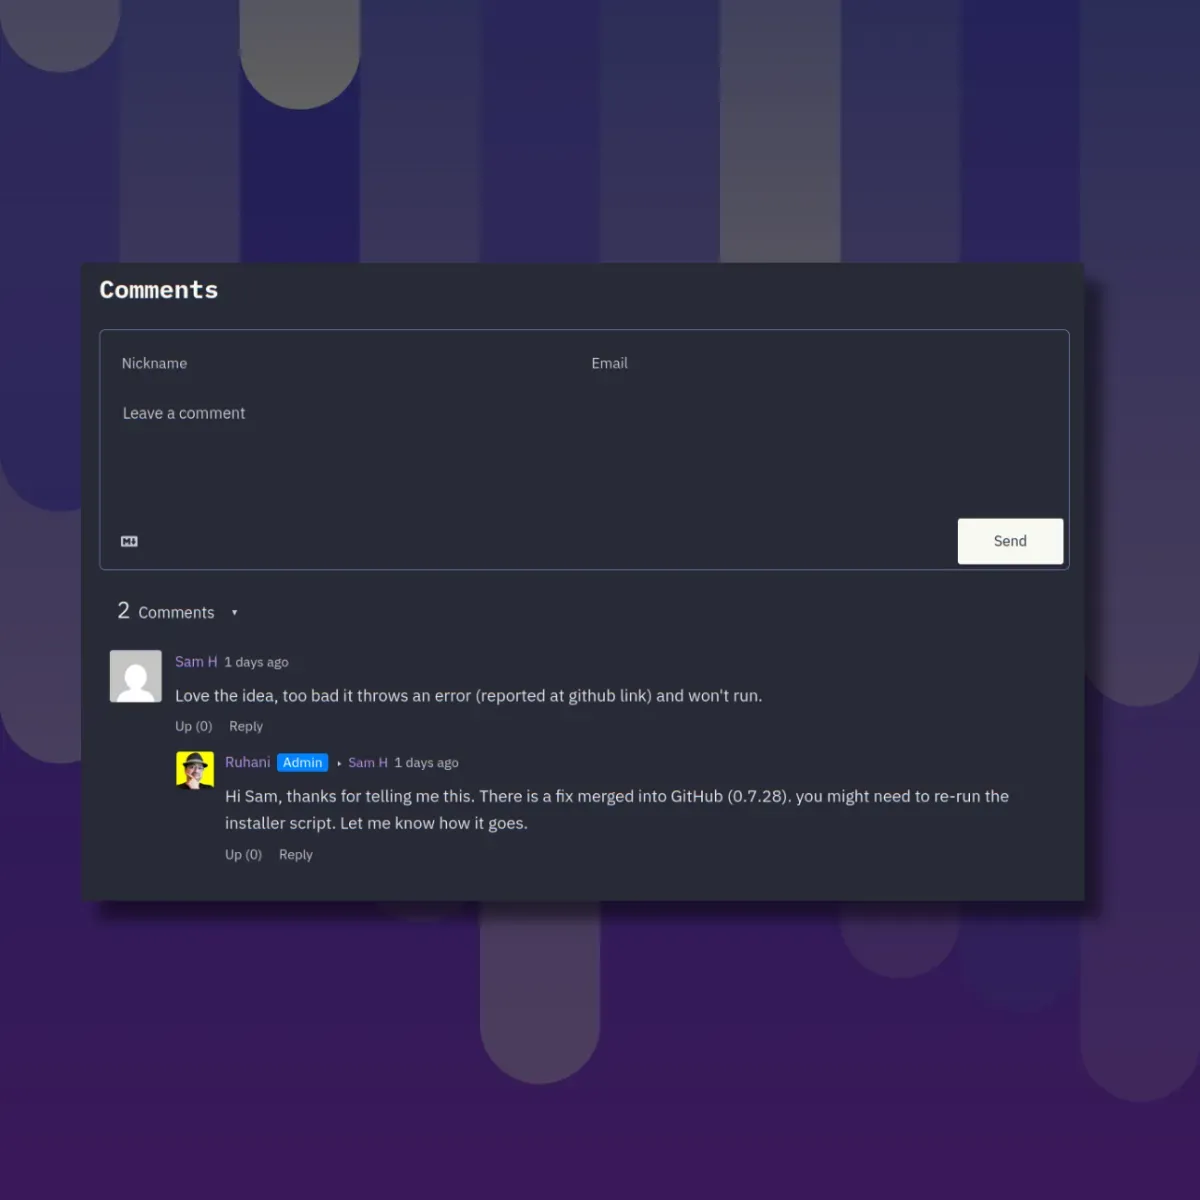
I backed up Isso’s SQLite database, and converted the few comments to Artalk’s Artrans format. The import kept both conversations, their dates and the reader’s upvote. My replies were mapped to my existing administrator nickname and email.
**Note**: Note
**Nickname and email** needs to match what you have setup for your admin. Otherwise it will not have the admin badge on comment replies.
Export Artalk before importing anything. Its importer appends comments, so importing the same bundle twice creates duplicates. Check the page paths and reply relationships before changing the live embed. The [migration documentation](https://artalk.js.org/en/guide/transfer.html) explains the format.
Keep the old service and backup until the imported conversations look right. Mine did, so I switched the shared Astro component and left Isso stopped. Now I can manage the blog’s comments from one dashboard.
Want to see how it works? Drop a comment in the comment box below.