How to Automatically Back Up and Restore Your Home Assistant Configuration to GitHub or GitLab (with Zero Downtime)
Easily automate Home Assistant config backups to GitHub or GitLab with step-by-step scripts and instant restore tips.
Home Assistant is the brains of your smart home, but even the most seasoned tinkerers have experienced the frustration of a corrupted SD card, accidental misconfiguration, or a failed upgrade. What if you could instantly roll back to a working state or migrate your entire setup to a new server with just one script? That’s the power of automated versioned backups with GitHub or GitLab.
In this guide, you’ll learn how to fully automate Home Assistant configuration backups to a private Git repository (GitHub or GitLab), with a built-in safety net for easy restoration—no more manual copying or guesswork.
Why Should You Back Up Your Home Assistant Configuration?
- Protect Against Data Loss: Hardware failure, power loss, or SD card corruption can wipe out months (or years) of tweaks and automations.
- Safe Experimentation: Easily roll back breaking changes, failed updates, or botched YAML edits.
- Portability: Instantly migrate your Home Assistant to new hardware, a fresh install, or another location.
- Version History: See exactly when and how your setup changed, and who changed it (if you collaborate).
- Peace of Mind: Sleep better knowing your smart home is always just a
git pullaway from full recovery.
Prerequisites
- Home Assistant installed (Home Assistant OS, Supervised, Container, or Core).
- Access to the Home Assistant file system (via SSH & Terminal add-on or host SSH).
- A GitHub or GitLab account with a private repository created for backups.
- Basic Git knowledge (cloning, committing, pushing).
- (Optional but recommended) A private SSH key set up for authentication.
Step 1: Prepare Your Home Assistant for Git Backups
1. Access Your Home Assistant Terminal
- Use the official Terminal & SSH add-on in Home Assistant, or SSH into your host (for advanced installations).
2. Generate or Place Your SSH Key
- If you don’t have an SSH key, generate one:
ssh-keygen -t ed25519 -C "your-email@example.com"- Save it to
/config/ssh/id_ed25519for persistence.
- Save it to
- Add the public key (
id_ed25519.pub) to your GitHub or GitLab account under SSH Keys.
3. Initialize a Git Repo (If Not Already Initialized)
In your Home Assistant config directory:
cd /config
git init
4. Add Your Remote Repo
- For GitHub:
git remote add origin git@github.com:YourUsername/your-ha-repo.git - For GitLab:
git remote add origin git@gitlab.com:YourUsername/your-ha-backup.git
5. Set Your Git User Info (Local)
git config user.name "Your Name"
git config user.email "your@email.com"
Step 2: Create the Backup Script
Place this as /config/git-auto-backup.sh:
#!/bin/bash

LOGFILE="/config/git-auto-backup.log"

{
    echo ""
    echo "===== Backup run at $(date '+%Y-%m-%d %H:%M:%S') ====="
    cd /config || { echo "Failed to cd /config"; exit 1; }

    # Set Git user info (change as needed)
    git config user.name "Your Name"
    git config user.email "your@email.com"

    # Add all changes
    git add .

    # Commit and push only if there are staged changes
    if ! git diff --cached --quiet; then
        git commit -m "Auto-backup: $(date '+%Y-%m-%d %H:%M:%S')" &&
        GIT_SSH_COMMAND="ssh -i /config/ssh/id_ed25519 -o UserKnownHostsFile=/config/ssh/known_hosts" git push origin main
        STATUS=$?
        if [ $STATUS -eq 0 ]; then
            echo "Backup and push succeeded."
        else
            echo "Push failed with exit code $STATUS."
        fi
    else
        echo "No changes to commit."
    fi

    echo "===== End run ====="
} >> "$LOGFILE" 2>&1
Make the script executable:
chmod +x /config/git-auto-backup.sh
Step 3: Automate Backups with Home Assistant (No Cron Needed!)
Cron is not available on Home Assistant OS by default.
Instead, use a Shell Command and a time-based Automation.
A. Add Shell Command
In your configuration.yaml:
shell_command:
  git_auto_backup: /bin/bash /config/git-auto-backup.sh
Looks like this, it may have multiple entries.

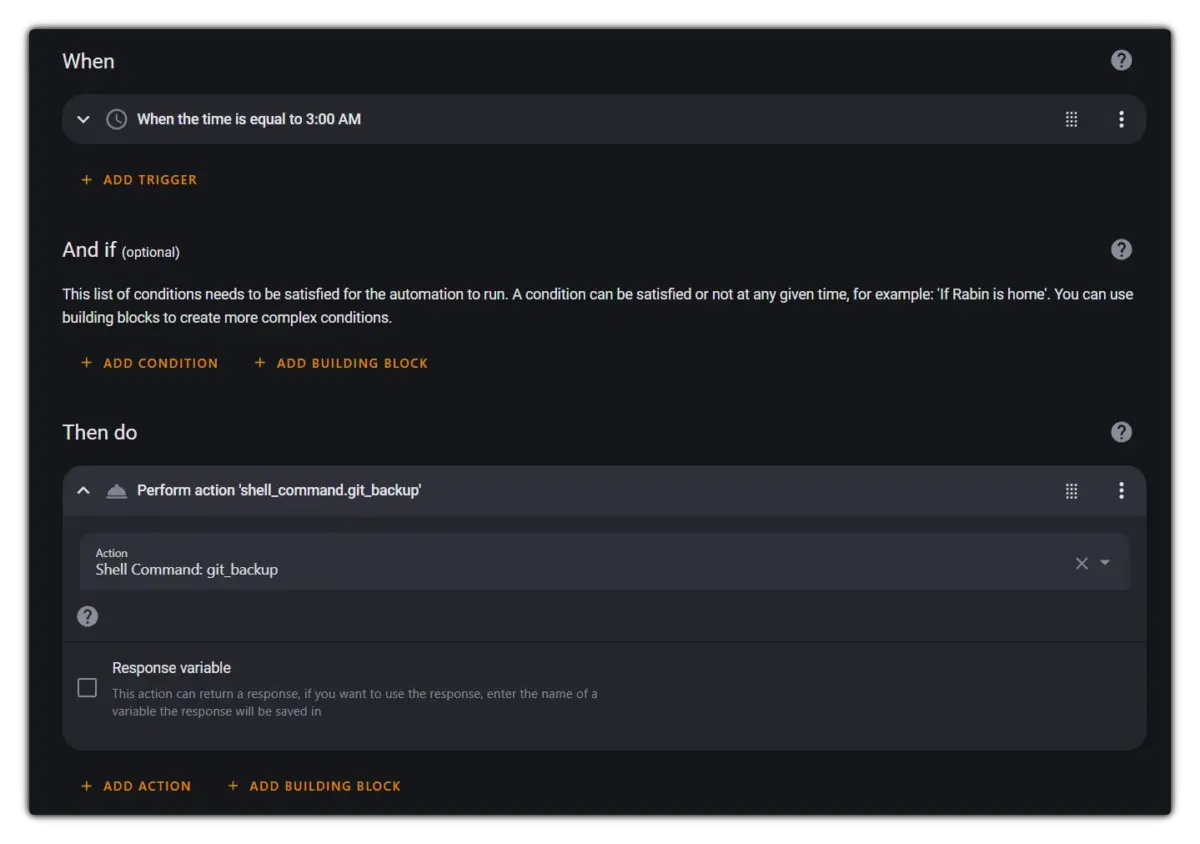
B. Create a Time-Based Automation
Add this automation (via UI or in YAML):
alias: Home Assistant Nightly Git Backup
trigger:
  - platform: time
    at: '03:00:00'
action:
  - service: shell_command.git_auto_backup
mode: single
Now, every night at 3am, your config is safely backed up to your Git repo!
You can also do the above using HA UI.
Step 4: Restore from Backup (Disaster Recovery)
Here’s a safe restore script that will backup your current config before restoring:
#!/bin/bash

# Restore script: /config/git-restore-backup.sh

BACKUP_DIR="/config_backup_$(date '+%Y%m%d-%H%M%S')"

echo "Backing up current /config to $BACKUP_DIR"
cp -a /config "$BACKUP_DIR"

cd /config || exit 1

# Set git user info
git config user.name "Your Name"
git config user.email "your@email.com"

# Fetch latest from main branch
GIT_SSH_COMMAND="ssh -i /config/ssh/id_ed25519" git fetch origin main

# Hard reset to remote main branch
GIT_SSH_COMMAND="ssh -i /config/ssh/id_ed25519" git reset --hard origin/main

echo "Restore complete. Your /config now matches the remote backup."
Don’t forget to make it executable:
chmod +x /config/git-restore-backup.sh
Run it manually when you need to restore.
Best Practices & Tips
- Use a “ file to exclude secrets, database files, and cache:
secrets.yaml *.db .cloud/ .storage/(Customize for your setup.) - Always use private repositories for Home Assistant config backups.
- Regularly check your backup log (
/config/git-auto-backup.log) to ensure successful runs. - Test your restore process on a test system before disaster strikes.
Conclusion
Automating Home Assistant config backups with GitHub or GitLab ensures your smart home brain is always safe and portable, no matter what happens. With just a few scripts and Home Assistant’s built-in automation, you get versioned, remote, restorable backups—completely hands-off.
Stay smart, stay backed up, and never fear a Home Assistant experiment again!
Did this guide help you? Share it with other smart home fans or leave a comment with your own backup tips!