
I have been eyeing implementing OIDC in the homelab for a while now. After a lot of research, while I found out Authentik is much more diverse and detailed, I went with the simpler solution, which is PocketID. I will explain below how to connect Pocket ID to a standalone Proxmox VE installation using OpenID Connect, or OIDC.
The result is a Proxmox login flow where users authenticate through Pocket ID using a passkey. Proxmox users and groups are created automatically, while administrator permissions are assigned through a Pocket ID group instead of directly to individual users.
This guide is based on a working configuration using:
- Proxmox VE 9.2
- Pocket ID running as a self-hosted service. I am assuming you have already done this properly.
- Nginx Proxy Manager as the HTTPS reverse proxy
- An internal DNS server for local DNS rewrites (optional; you can do it in some other ways)
- A standalone, non-clustered Proxmox VE installation
For this tutorial, we will use the example Proxmox hostname:
https://proxmox.yourdomain.comThe example Pocket ID hostname is:
https://pocketid.yourdomain.comReplace all example domains, group names, usernames, and network addresses with values appropriate for your environment.
Important Safety Requirements
Keep these recovery methods available:
root@pamlogin through the Proxmox web interface- SSH key access to the Proxmox host
- Direct LAN access to the Proxmox management interface
Pocket ID should be an additional authentication method, not the only way to administer the host.
Keep an existing root@pam browser session and an SSH session open while configuring and testing OIDC.
Before changing realms or ACLs, keep a versioned backup of the Proxmox host configuration as another recovery aid.
Example Architecture
| Component | Example |
|---|---|
| Proxmox hostname | https://proxmox.yourdomain.com |
| Pocket ID hostname | https://pocketid.yourdomain.com |
| Reverse proxy | Nginx Proxy Manager |
| Proxmox upstream | https://PROXMOX-LAN-IP:8006 |
| Internal DNS | Local DNS rewrite to the reverse proxy |
If you have multiple standalone Proxmox installations, configure a separate Pocket ID OIDC client and Proxmox realm on each one. Do not assume configuration is shared between hosts.
Step 1: Confirm Your Proxmox Version
Connect to the Proxmox host through SSH or its local shell and run:
pveversion -vThe tested installation used:
proxmox-ve: 9.2.0pve-manager: 9.2.2libpve-access-control: 9.1.1Recent Proxmox VE releases support automatic OIDC user creation, automatic group creation, group claims and group-membership overwrite.
Step 2: Check Whether OIDC Group Options Are Available
pveum realm add --helpIt fails because pveum does not use the usual subcommand --help format:
Unknown option: help400 unable to parse optionThe correct Proxmox command is:
pveum help realm addTo display only the relevant OIDC options, use:
pveum help realm add 2>&1 | grep -E \'groups-claim|groups-autocreate|groups-overwrite|username-claim|autocreate'A compatible Proxmox installation should show options including:
--autocreate--groups-autocreate--groups-claim--groups-overwrite--username-claimYou can also inspect the API schema:
pvesh usage /access/domains --verbose 2>&1 | grep -E \'groups-claim|groups-autocreate|groups-overwrite|username-claim|openid'Step 3: Configure the Proxmox HTTPS URL and Reverse Proxy
The browser-facing Proxmox hostname must already work over HTTPS before configuring OIDC.
A reverse proxy is not mandatory. However, Proxmox must have a stable, browser-accessible HTTPS URL with a trusted certificate before the OIDC client is configured.
For example, your internal DNS may resolve:
proxmox.yourdomain.com → REVERSE-PROXY-LAN-IPNginx Proxy Manager then forwards the request to:
https://PROXMOX-LAN-IP:8006Configure Nginx Proxy Manager
The Nginx Proxy Manager proxy host for proxmox.yourdomain.com should use:
| Setting | Value |
|---|---|
| Domain Name | proxmox.yourdomain.com |
| Scheme | https |
| Forward Hostname or IP | PROXMOX-LAN-IP |
| Forward Port | 8006 |
| Websockets Support | Enabled |
| Cache Assets | Disabled |
| Force SSL | Enabled |
| HTTP/2 Support | Enabled |
WebSocket support is required for Proxmox noVNC, browser terminals, and interactive console sessions.
If the existing proxy already loads Proxmox correctly and consoles work, avoid adding unnecessary custom directives.
If Nginx Proxy Manager reports upstream certificate verification errors because Proxmox uses a self-signed certificate, the following directive may be added to the proxy host’s Advanced section:
proxy_ssl_verify off;This affects only the connection between Nginx Proxy Manager and the Proxmox upstream. Browser-facing HTTPS should still use a valid certificate.
Do not place an additional Nginx Proxy Manager Access List or forward-auth layer in front of Proxmox. Proxmox is already the OIDC client, and a second authentication layer can interfere with redirects, API requests, and WebSocket connections.
Confirm that the Proxmox hostname works without a certificate warning:
curl -I https://proxmox.yourdomain.com/Also confirm that the Proxmox host can reach Pocket ID directly:
curl -fsS \ https://pocketid.yourdomain.com/.well-known/openid-configuration | python3 -m json.toolThis test must work from the Proxmox host, not only from a workstation browser. Proxmox performs server-side OIDC discovery and token exchange.
Step 4: Create Pocket ID Groups
Open Pocket ID and create two user groups.
For example:
proxmox_usersproxmox_adminsThe groups have separate purposes:
proxmox_usersallows ordinary access to this Proxmox installation.proxmox_adminsidentifies users who should receive the Proxmox Administrator role.
Add your initial administrator account to both groups.
Use simple lowercase group names containing letters, numbers, hyphens, or underscores. Most importantly, record the exact spelling.
Proxmox treats these as different group names:
proxmox-adminsproxmox_adminsA hyphen and an underscore are not interchangeable.
Step 5: Create a Dedicated Pocket ID OIDC Client
In Pocket ID, open the OIDC client section and create a new client.
Use a descriptive name such as:
ProxmoxSet the callback URL to exactly ( no trailing slash):
https://proxmox.yourdomain.comDo not use any of these variations:
https://proxmox.yourdomain.com/https://proxmox.yourdomain.com:8006https://PROXMOX-LAN-IP:8006https://proxmox.yourdomain.com/callbackhttps://proxmox.yourdomain.com/api2/json/access/openid/loginThe callback must match the browser-facing Proxmox base URL.
Under Allowed User Groups, select:
proxmox_usersproxmox_adminsA new Pocket ID OIDC client does not allow anyone to sign in until you select the allowed users or groups. Use Unrestrict only if you intentionally want every Pocket ID user to access this Proxmox login.
After saving the client, securely copy:
- Client ID
- Client Secret
Do not publish either value in screenshots, terminal output, or documentation. If any part of the client secret becomes visible, rotate it in Pocket ID and update the Proxmox realm.
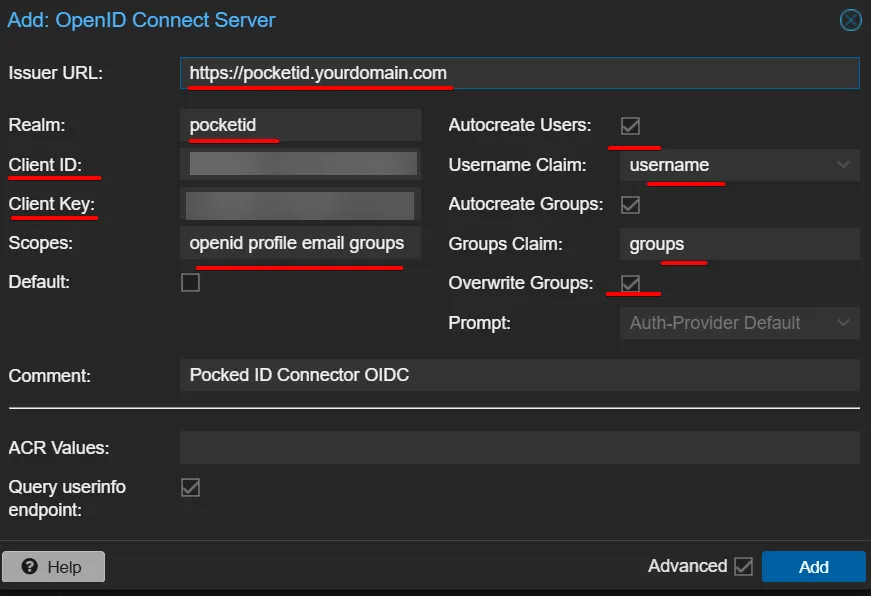
Step 6: Add the OpenID Connect Realm in Proxmox
Log in to https://proxmox.yourdomain.com using root@pam.
Navigate to:
Datacenter→ Permissions→ Realms→ Add→ OpenID Connect ServerEnter the following settings:
| Field | Value |
|---|---|
| Issuer URL | https://pocketid.yourdomain.com |
| Realm | pocketid |
| Client ID | Client ID generated by Pocket ID |
| Client Key | Client secret generated by Pocket ID |
| Scopes | openid profile email groups |
| Autocreate Users | Enabled |
| Username Claim | username |
| Autocreate Groups | Enabled |
| Groups Claim | groups |
| Overwrite Groups | Enabled |
| Query userinfo endpoint | Enabled |
| Default | Disabled during initial testing |
Leave these fields empty unless your identity provider specifically requires them:
- ACR Values
- Audiences
- Prompt
Why Use the Username Claim?
✅ Use:
usernameThis creates a Proxmox account similar to:
youruser@pocketidUsing the email claim would create a longer account name similar to:
[email protected]@pocketidThe Proxmox interface offers supported username mappings such as username, email and the OIDC subject. Do not manually enter preferred_username when the Proxmox interface provides username.
Step 7: Verify the Saved Realm
On the Proxmox host, inspect the realm configuration:
grep -A20 '^openid: pocketid' /etc/pve/domains.cfgA working configuration should resemble:
openid: pocketid client-id REDACTED issuer-url https://pocketid.yourdomain.com autocreate 1 client-key REDACTED default 0 groups-autocreate 1 groups-claim groups groups-overwrite 1 query-userinfo 1 scopes openid profile email groups username-claim usernameAlways redact the client ID and client key before sharing this output publicly.
Step 8: Understand Proxmox OIDC Group Names
This is one of the most important details in the configuration.
Proxmox does not use the Pocket ID group name unchanged. It appends the OIDC realm name as a suffix.
For example, Pocket ID sends:
proxmox_adminsThe Proxmox realm is:
pocketidProxmox therefore creates:
proxmox_admins-pocketidThe ordinary user group becomes:
proxmox_users-pocketidDo not guess these final names. Perform the first login and inspect the automatically created groups.
Step 9: Perform the First Passkey Login
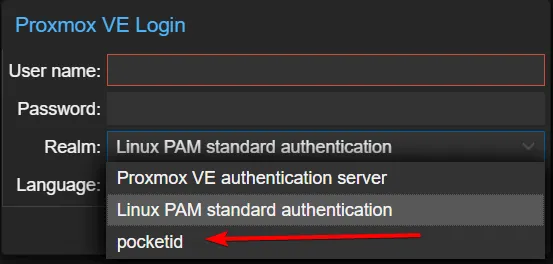
Keep the existing root@pam browser session open.
- Open a private or incognito browser window.
- Visit
https://proxmox.yourdomain.com. - Select the
pocketidrealm. - Click the OpenID login button.
- Confirm that the browser redirects to the correct Pocket ID domain.
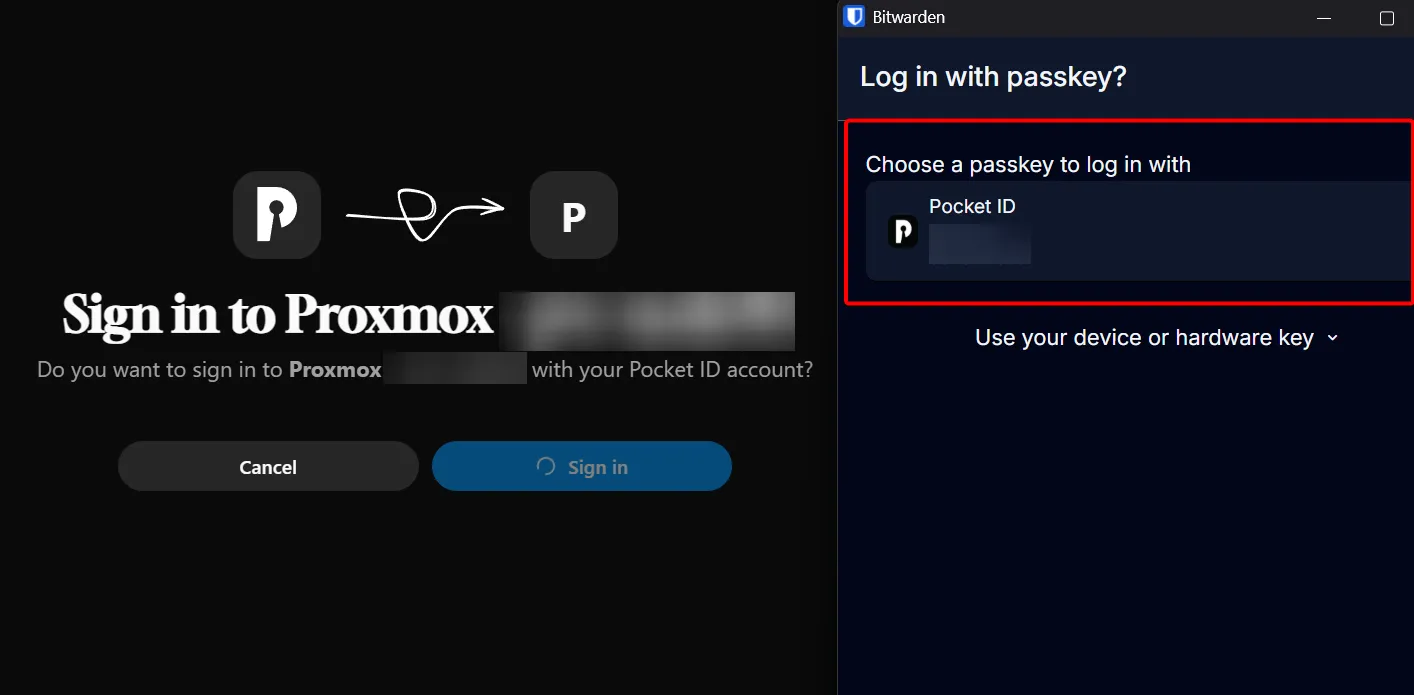
- Authenticate with a registered passkey.
- Confirm that the browser returns to
https://proxmox.yourdomain.com.
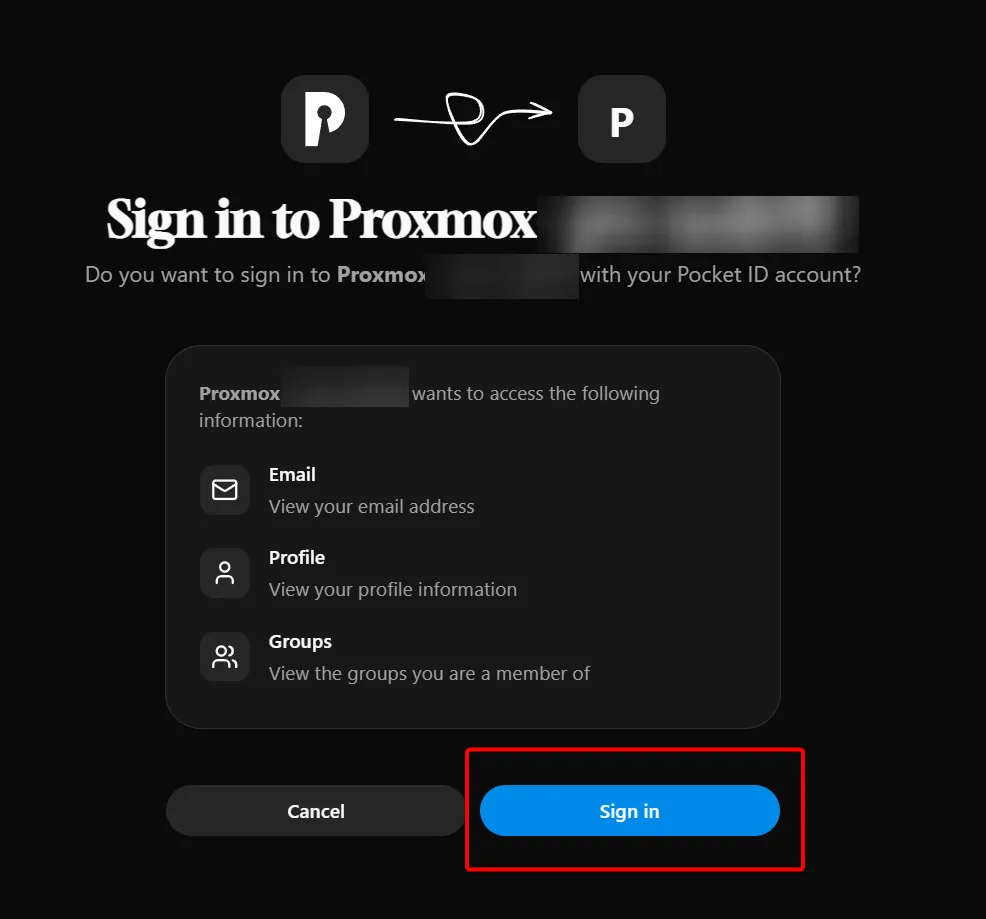
At this stage, authentication may succeed while no nodes or resources are visible. This does not necessarily mean OIDC failed.
It usually means the new user has been created successfully but does not yet have a Proxmox permission assignment.
Step 10: Verify the Automatically Created User
On the Proxmox host, run:
pveum user list | grep '@pocketid'A successfully created account should appear similar to:
youruser@pocketidInspect the relevant user and group entries:
grep -E \'proxmox_(users|admins)-pocketid|@pocketid' \/etc/pve/user.cfgExample:
user:youruser@pocketid:1:0:First:Last:[email protected]:::group:proxmox_admins-pocketid:youruser@pocketid::group:proxmox_users-pocketid:youruser@pocketid::This output reveals the exact group names Proxmox created.
Step 11: Assign Administrator Permission to the Imported Group
Assign permissions to the automatically created group, not directly to the user.
For the example group:
proxmox_admins-pocketidRun:
pveum acl modify / \ --group proxmox_admins-pocketid \ --role AdministratorThe path / applies the role to the entire Proxmox installation.
Verify the permission:
pveum acl list | grep pocketidThe result should resemble:
/ Administrator group proxmox_admins-pocketidAvoid Creating the Wrong Group
For example, this manually created group:
proxmox-admins-pocketidis different from the automatically imported group:
proxmox_admins-pocketidIf the Administrator ACL is assigned to the wrong group, authentication succeeds but the user may see no Proxmox nodes or resources.
The solution is to assign the ACL to the exact group shown in /etc/pve/user.cfg:
pveum acl modify / \ --group proxmox_admins-pocketid \ --role AdministratorAfter confirming that the correct ACL works, remove any incorrect ACL and unused lookalike group.
Inspect the supported deletion syntax before removing an ACL:
pveum help acl deleteThe unused group can be removed with:
pveum group delete proxmox-admins-pocketidNever delete the group that contains the active OIDC user.
Step 12: Sign In Again and Verify Access
- Sign out of the Pocket ID Proxmox session.
- Open a fresh private browser window.
- Visit
https://proxmox.yourdomain.com. - Select the
pocketidrealm. - Authenticate with a passkey.
The Proxmox node and permitted resources should now appear.
The permission chain is:
Pocket ID user→ Pocket ID proxmox_admins group→ OIDC groups claim→ Proxmox proxmox_admins-pocketid group→ Administrator role on /No direct user ACL is required.
How Automatic Group Updates Work
The realm has these options enabled:
groups-autocreate 1groups-overwrite 1groups-autocreate allows Proxmox to create groups received through the OIDC groups claim.
groups-overwrite makes the identity provider authoritative for that OIDC user’s group membership during login.
For example, if a user is removed from proxmox_admins in Pocket ID, the user should lose membership in proxmox_admins-pocketid after the next successful login.
This makes permission management cleaner than assigning Administrator directly to individual OIDC accounts.
Step 13: Verify Passkey Authentication
To test the complete passkey flow rather than an existing Pocket ID browser session:
- Sign out of Pocket ID.
- Open a new private browser window.
- Visit the Proxmox login page.
- Select the
pocketidrealm. - Confirm the redirect goes to the legitimate Pocket ID hostname.
- Complete the passkey prompt.
- Confirm the browser returns to Proxmox.
- Confirm the logged-in user ends with
@pocketid.
Pocket ID handles the passkey authentication. Proxmox does not receive or store the passkey.
Why the Proxmox Host Shell Asks for a Login
For example:
youruser@pocketidmay exist in the Proxmox access-control database, but it does not exist in:
/etc/passwdTherefore, opening the host shell from the Proxmox interface while signed in through OIDC may display a Linux login prompt.
This differs from a root@pam session because root@pam maps to the real local Linux root account.
This is not an OIDC configuration failure.
A practical operating model is:
| Task | Authentication |
|---|---|
| Proxmox web interface | Pocket ID passkey |
| VM and LXC administration | Pocket ID passkey |
| Guest console access | Pocket ID passkey |
| Proxmox host shell | root@pam or local Linux credentials |
| Direct host maintenance | SSH key |
| Identity-provider failure recovery | root@pam or SSH key |
Step 14: Test Break-Glass Recovery
After Pocket ID login works, test what happens when Pocket ID is unavailable.
Before stopping Pocket ID, verify both recovery methods:
ssh root@PROXMOX-LAN-IPAlso verify that root@pam still works through the Proxmox web interface.
Stop the Pocket ID container or service using the command appropriate for your environment.
For a Proxmox LXC container, that may resemble:
pct shutdown CONTAINER-ID --timeout 60pct status CONTAINER-IDTest the following:
- Pocket ID login should fail because the identity provider is unavailable.
root@pamlogin should continue to work.- SSH key access to the Proxmox host should continue to work.
Restart Pocket ID:
pct start CONTAINER-IDpct status CONTAINER-IDConfirm that the Proxmox host can reach OIDC discovery again:
curl -fsS \ https://pocketid.yourdomain.com/.well-known/openid-configuration \ >/dev/null &&echo "Pocket ID discovery reachable"Then repeat the private-window passkey login.
Troubleshooting
OIDC Login Works but No Proxmox Nodes Are Visible
This usually means authentication succeeded, but the user has no ACL.
Check the imported groups:
grep -E 'pocketid|@pocketid' /etc/pve/user.cfgAssign the Administrator role to the exact imported administrator group:
pveum acl modify / \ --group EXACT_IMPORTED_GROUP_NAME \ --role AdministratorDo not assume hyphens and underscores are equivalent.
Redirect URI Mismatch
Confirm that the Pocket ID callback is exactly:
https://proxmox.yourdomain.comUser is created, but Groups Are Missing
Verify that the realm contains:
scopes openid profile email groupsgroups-claim groupsgroups-autocreate 1Also verify that the Pocket ID user belongs to the expected groups and that those groups are allowed to use the OIDC client.
Proxmox Interface Works but noVNC Does Not
Check that Nginx Proxy Manager has WebSocket support enabled.
Also confirm that no access list or second authentication proxy is intercepting WebSocket requests.
Inspect Proxmox Authentication Logs
journalctl -f \ -u pveproxy \ -u pvedaemonRecent OIDC-related messages can be filtered with:
journalctl --since "-10 minutes" |grep -Ei 'openid|oidc|authentication|realm|group'Inspect Users, Groups and Permissions
pveum realm listpveum user listpveum group listpveum acl listFinal Verification Checklist
Pocket ID
- The ordinary user group exists.
- The administrator group exists.
- The administrator account belongs to both groups.
- A dedicated OIDC client exists for this Proxmox installation.
- The callback is exactly
https://proxmox.yourdomain.com. - The client ID and secret are stored securely.
Proxmox Realm
- The realm ID is
pocketid. - The issuer URL is the Pocket ID base URL.
- The username claim is
username. - The scopes are
openid profile email groups. - Automatic user creation is enabled.
- The groups claim is
groups. - Automatic group creation is enabled.
- Group overwrite is enabled.
- The userinfo endpoint option is enabled.
- The PAM realm remains available.
Permissions
- The OIDC user was created successfully.
- The exact imported group names were checked in
/etc/pve/user.cfg. - The Administrator ACL is assigned to the actual imported administrator group.
- No direct Administrator ACL is required for the individual user.
- No unused lookalike group remains with hyphens or underscores in the wrong places.
Reverse Proxy
- The Proxmox hostname has a valid certificate.
- Nginx Proxy Manager forwards to HTTPS port 8006.
- WebSocket support is enabled.
- noVNC and browser consoles work.
- No second authentication layer is placed in front of Proxmox.
Recovery
root@pamremains usable.- SSH key access remains usable.
- Pocket ID login fails safely while Pocket ID is stopped.
- Local PAM and SSH access continue working while Pocket ID is unavailable.
- Passkey login works again after Pocket ID restarts.
Conclusion
Pocket ID provides a clean passkey-based login experience for Proxmox VE without replacing the local PAM or SSH recovery paths.
The most important implementation detail is group naming. Proxmox automatically appends the realm suffix to groups received from Pocket ID. Always inspect the generated groups after the first login instead of manually guessing their final names.
Once the correct imported group receives the Administrator ACL, Pocket ID group membership becomes the source of authorization. Users can then be granted or removed from Proxmox administration through Pocket ID without assigning permissions directly to each Proxmox account.
OIDC should remain an additional management layer. Keep root@pam and SSH keys available so that Proxmox remains recoverable even when Pocket ID or the reverse proxy is unavailable.
Let me know if this helped or if you have implemented something similar like with Authentik.
Comments