My NAS has already accumulated years of movies and TV shows. Some of the newer ones are already HEVC (H.265). Others are older H.264 files that take up more storage, and I usually shrug about it. Buying more disks is always an option (but you already know AI bros spiking the pricing of it). I just wanted to see how much space I could get back from files I already have.
While writing this, I have already reduced 91 GB from approximately 20 movie files, without sacrificing quality.
My mental requirement for this, was simple: convert H.264 to H.265, keep the videos looking good, and don’t replace a movie if the new file is the same size or bigger. I also didn’t want to lose audio tracks, subtitles, or the filenames managed by Radarr and Sonarr.
I ended up using Tdarr on the Ubuntu VM that already runs Plex. That VM already has an NVIDIA Quadro P1000 passed through to it. Rather than buy another GPU or run a second heavy workload elsewhere, I could use the hardware I already owned.
This is the setup I actually tested, including the bits I got wrong. It is a starting point, not a universal claim that HEVC is always better or that everyone should use the same quality setting.
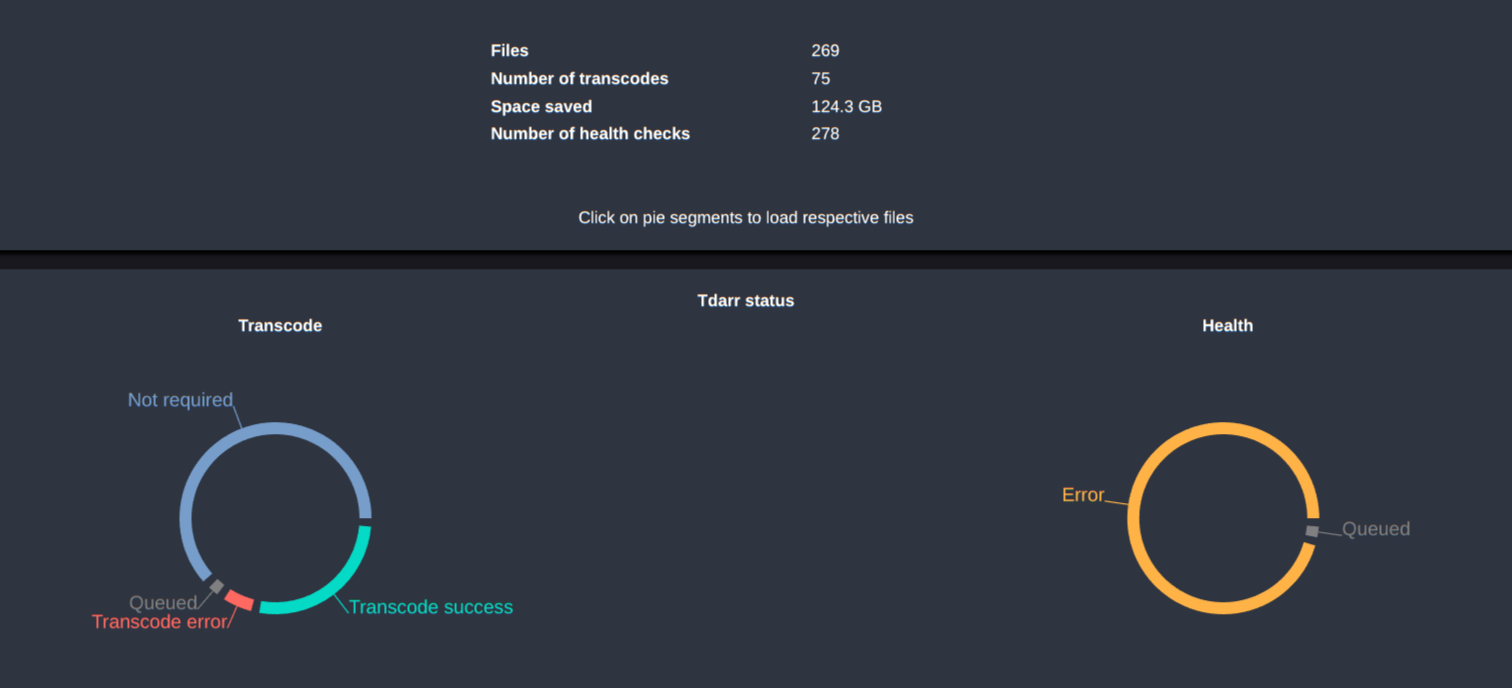
The short version
If you already have an NVIDIA GPU accessible from Linux, you can use Tdarr to:
- Scan your movie or TV library.
- Select only H.264 files for conversion.
- Skip files below a size threshold (I chose 2 GB).
- Use NVDEC to decode and NVENC to encode HEVC.
- Compare the converted file against the original.
- Keep the original if the converted version is not smaller.
- Notify Radarr or Sonarr, apply their naming policy, and refresh again.
I also put a manual review gate before encoding while I was testing selectively, what worked. It means Tdarr doesn’t start converting a file until I approve it. Later, I have removed that step already.
Why I wanted to recompress the library
Video files are not all created equal. Two 1080p movies can look similar on a TV and still be wildly different sizes. Some of that is the codec, some is the bitrate, and some is how the file was encoded in the first place. And also sometimes it can contain multiple audio tracks in different languages.
H.264 (also called AVC) is common and compatible. H.265 (also called HEVC) can often give a similar-looking picture at a lower bitrate, which means a smaller file. That is the part I was mostly interested about: less NAS space used without a noticeable loss during normal viewing.
Note
There are usually trade-offs. Re-encoding always involves another lossy generation unless you use lossless settings. A smaller file does not automatically mean better quality. You may notice differences in dark scenes, grain, fast motion, or fine details. Hardware encoding is fast, but it is not magic.
My goal wasn’t to win a video-quality benchmark. I wanted a practical way to reduce storage use across a large library, with enough checks to avoid making things worse.
Why I stopped using FileFlows
I actually started with FileFlows. It has a nice flow-based approach and looked like it could handle exactly this kind of job.
The thing that destroyed my attention, for my particular test, was the licensing around the video optimization features I wanted. I ran into a paid-feature boundary for the HEVC workflow. The app author could simply mark it as a paid node, rather than being sneaky about it. FileFlows has a free personal tier, but its pricing and feature table distinguishes that tier from paid functionality. Check the current plan details yourself; they can change.
I didn’t want another recurring cost just to make use of a GPU that was already sitting in my Plex VM. So I stopped that experiment, removed all the FileFlows components I had installed, and tried Tdarr instead.
Note
This is not a claim that FileFlows is a bad application. It simply wasn’t the right fit for this particular job and budget. Also, the ethics about flow nodes not being marked as paid flow nodes, kind of played a huge role.
My actual setup
| Component | What I use |
|---|---|
| Virtualization | Proxmox VE on pve-node01 |
| VM | ubuntu-plex, Ubuntu 24.04 LTS |
| Media player/service | Plex Media Server in the same VM |
| GPU | NVIDIA Quadro P1000, 4 GB, passed through to the VM (does not support AV1) |
| Transcoder | Tdarr Server and Tdarr Node, native Linux installation |
| Media storage | Synology NAS, mounted over NFS |
| Tdarr media path | /mnt/nas-media/media/movies and /mnt/nas-media/media/tv |
| Tdarr temporary cache | /mnt/fileflows-temp on a separate ~200 GiB virtual disk |
| Radarr/Sonarr | Docker containers on the NAS |
| Main Plex playback | Apple TV 4K |
Yes, the cache directory still has fileflows in its name. I reused the scratch disk after moving to Tdarr. The name doesn’t matter.
The layout is roughly:
Synology NAS (NFS media)
    |
    +-- /volume1/data-media/media/movies
    +-- /volume1/data-media/media/tv
    |
    +--> Ubuntu VM: ubuntu-plex
             |
             +-- /mnt/nas-media  (same media, NFS mount)
             +-- Plex Media Server
             +-- NVIDIA Quadro P1000
             +-- Tdarr Server + Tdarr Node
             +-- /mnt/fileflows-temp (local scratch disk)

NAS Docker containers:
    Radarr/Sonarr see the media as /data-media/media/...
The different paths are intentional. Docker sees /data-media; the Ubuntu VM sees /mnt/nas-media. They refer to the same files on the NAS. Tdarr’s Server and Node run in the same VM, so they both use the same mount paths. That avoids Tdarr-to-Tdarr path translation.
For reference, the Arr Docker volume mapping is:
volumes:
  - /volume1/docker/sonarr:/config
  - /volume1/data-media:/data-media
Radarr uses the equivalent mapping with its own config directory. You do not need to change the Arr containers just because Tdarr runs elsewhere.
Important
The Tdarr Node needs read/write access to the library if your flow replaces files. A read-only Plex mount is not enough. Verify NAS permissions before enabling replacement.
Step 1: Make sure Linux can actually use the NVIDIA GPU
This guide assumes the NVIDIA driver and GPU passthrough are already working. If you’re running Tdarr directly on Linux instead of in a VM, you can skip the Proxmox passthrough part. The key is that the operating system running the Tdarr Node can see the GPU.
In the Linux terminal:
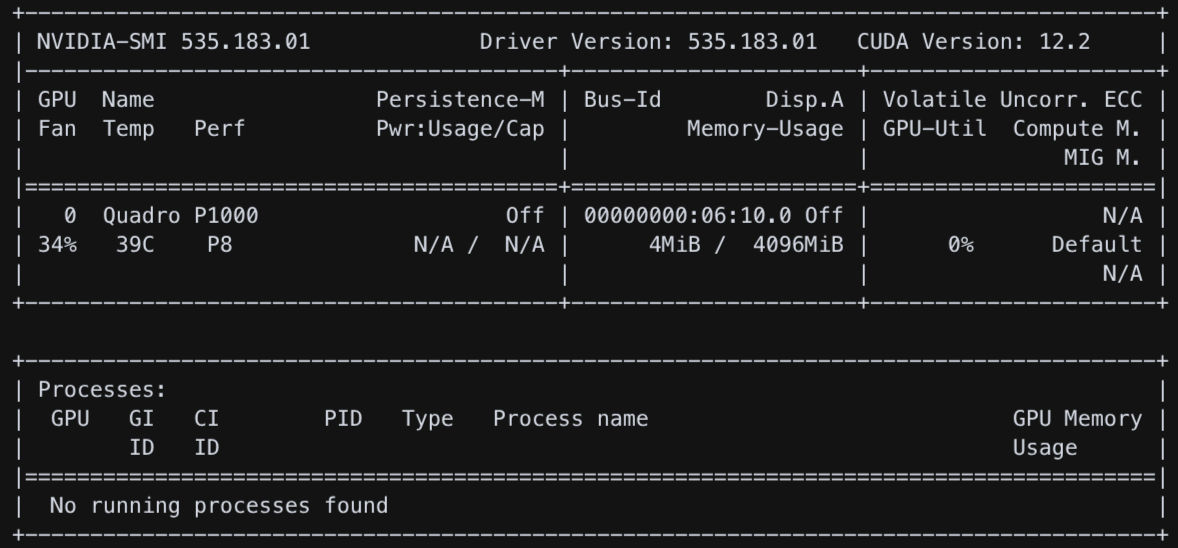
nvidia-smiYou should see your NVIDIA GPU listed. On my VM, it is the Quadro P1000.
Check the mount and cache too:
findmnt /mnt/nas-media
findmnt /mnt/fileflows-temp

df -h /mnt/nas-media /mnt/fileflows-temp
Don’t start a library-wide conversion if the NAS mount isn’t present or the cache disk is almost full. A transcoding cache needs room for intermediate files, and multiple staged jobs can fill it surprisingly quickly.
Step 2: Install Tdarr Server and Node on Linux
Tdarr has two pieces worth understanding:
- Tdarr Server keeps track of libraries, jobs, flows, and the web interface.
- Tdarr Node does the actual encoding.
They can run on separate systems, but mine both run on ubuntu-plex. That is enough for this job. You do not need a cluster of workers.
For a native Linux installation, follow Tdarr’s official Windows, Linux and macOS installation guide. Download the Linux x64 Tdarr Updater, extract it to a persistent application directory, and run it to download the Server and Node components.
For my setup, I keep Tdarr under /opt/tdarr. The official native installation procedure is:
- Download the appropriate
Tdarr_Updaterarchive from the official guide. - Extract it into your chosen Tdarr application directory.
- Make
Tdarr_Updaterexecutable if needed, then run it. - Start Tdarr Server and Tdarr Node from the extracted application directory.
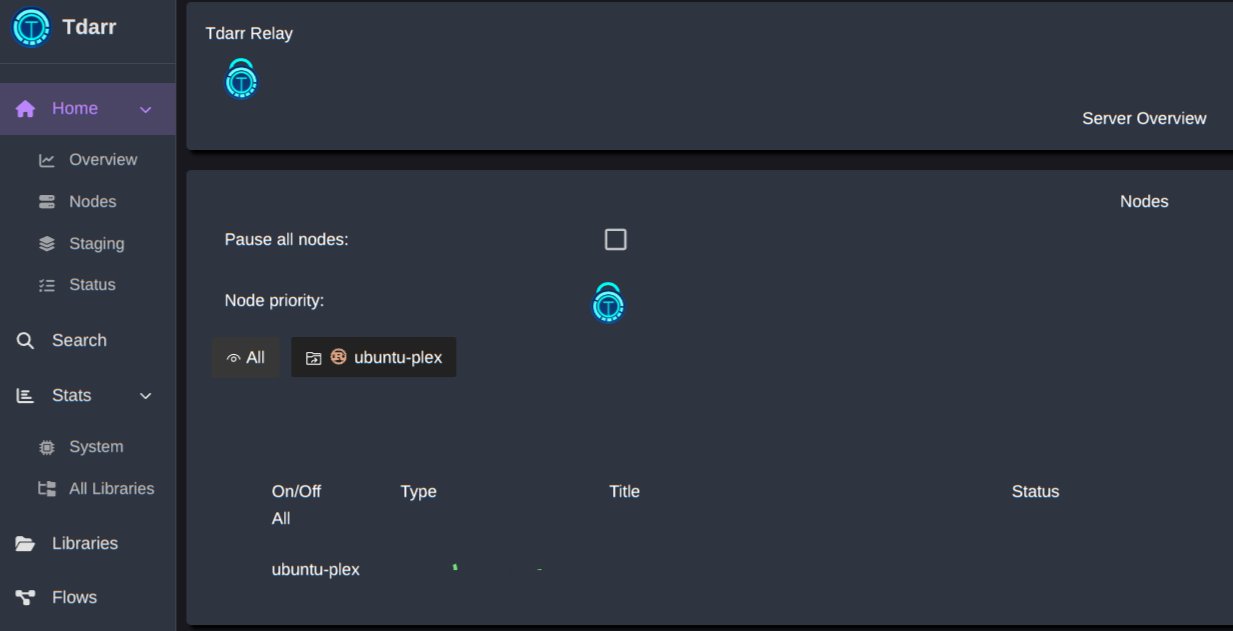
- Open the web interface at port 8265.
The upstream guide gives the startup commands, run from the Tdarr application directory:
./Tdarr_Server/Tdarr_Server
./Tdarr_Node/Tdarr_Node
Run those in separate terminals for the initial test so you can read errors directly. Tdarr uses 8266 for Server/Node communication by default, and 8265 for its web UI.
My installation is managed by two systemd services, tdarr-server.service and tdarr-node.service, rather than keeping terminal windows open. It’s not a requirement; it is my deployment choice. Service files depend on the installation directory and service account, so don’t copy random unit files without checking their paths and permissions.
If you already have a working Tdarr installation, don’t reinstall it just to follow this article.
Useful checks on my VM:
systemctl status tdarr-server tdarr-node --no-pager
journalctl -u tdarr-node -n 60 --no-pager
I also had a few optional tool warnings during setup, including missing HandBrakeCLI and CCExtractor dependencies. The FFmpeg-based NVENC flow still worked. Don’t try to fix a missing shared library by creating a fake symlink to an incompatible version. Install supported dependencies only when your selected workflow needs them.
Step 3: Open the web interface and configure one GPU worker
On my LAN the interface is:
http://192.168.89.89:8265For your installation, use http://YOUR-LINUX-HOST:8265. Do not expose an unauthenticated Tdarr UI directly to the public internet.
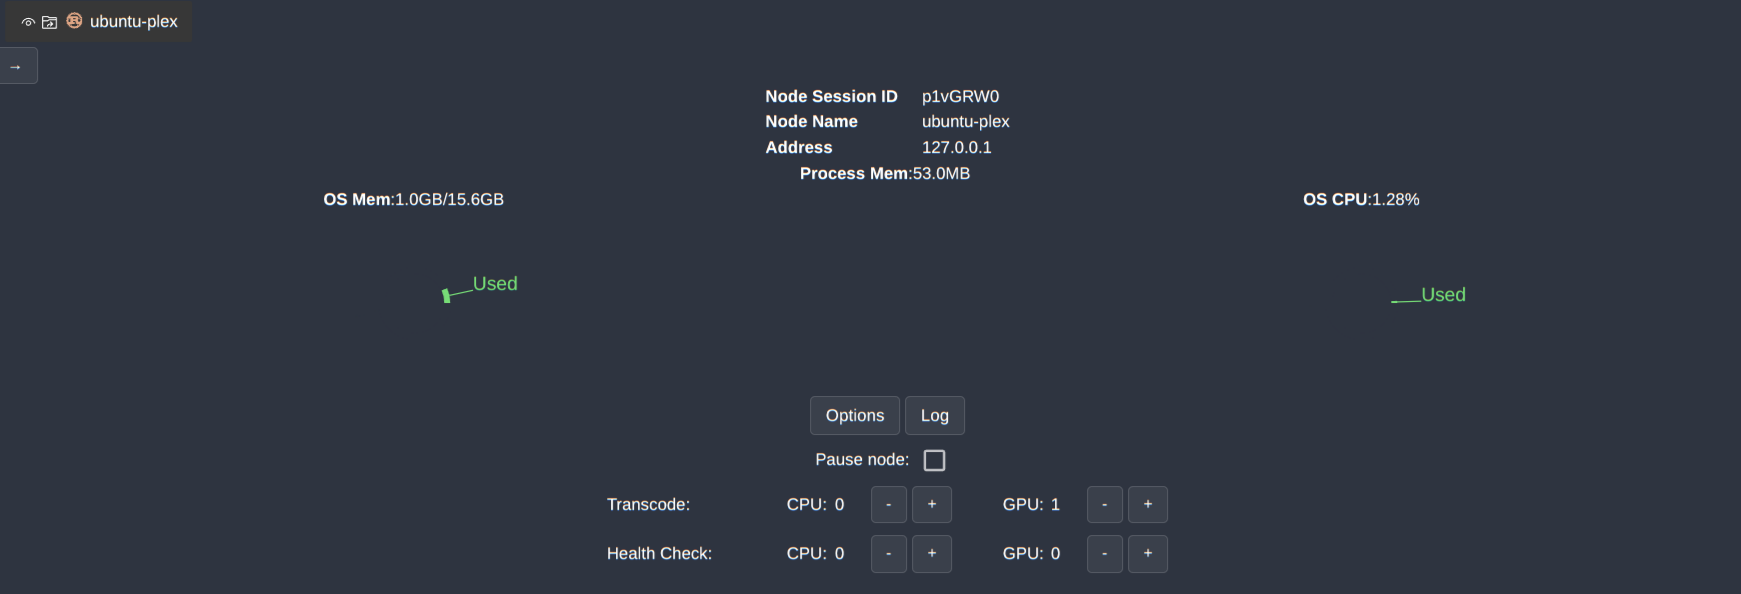
Under the Tdarr tab, find the connected Node. I configured:
| Worker type | Count |
|---|---|
| GPU transcode | 1 |
| CPU transcode | 0 |
| GPU health check | 0 |
| CPU health check | 0 |
One worker is intentional. Plex and Tdarr share the same GPU. I don’t need to process five movies at once, and my normal Plex usage is one Apple TV stream.
I initially had health-check errors because a quick-check path expected HandBrakeCLI that wasn’t installed. Rather than chasing these unrelated warnings, I kept health-check workers at zero during the encoding tests. This does not mean that health checks are useless; configure them properly if you want them in production.
Step 4: Create a test library before touching the real movies
This was important. I first copied a handful of movies into a separate folder:
/mnt/nas-media/ff_testIn Tdarr, open Libraries, create a library, and set:
- Source:
/mnt/nas-media/ff_test - Transcode Cache:
/mnt/fileflows-temp - Flow: the HEVC flow you’ll build below
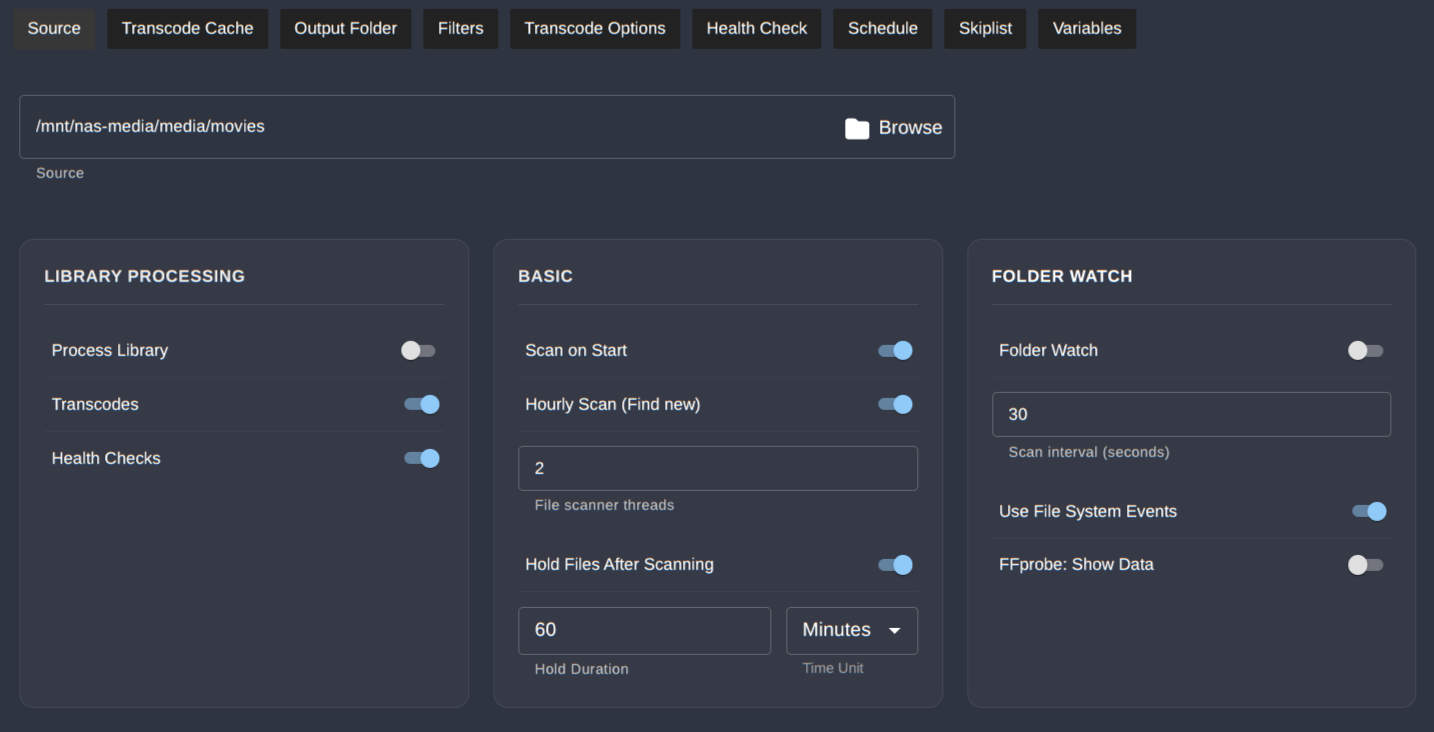
- Process Library / Transcodes: enabled when ready to test
- Scan on Start: enabled
- Hourly Scan (Find new): enabled
- Folder Watch: disabled
I use hourly scanning because the files live on an NFS share and there is no need to detect every change immediately. For the production libraries I also chose Hold Files After Scanning: 60 minutes as a precaution against scanning during the final import. That delay is not a guarantee that a file copy has finished.
My downloads are handled by SABnzbd and, occasionally, qBittorrent. Sonarr/Radarr process and import the completed files into the media folders. The download and extraction folders are separate from the final library.
A gotcha: The test directory was outside Radarr’s registered root. Tdarr could encode and rename the copied movie there, but Radarr couldn’t update that test copy as if it were the movie it tracks. Don’t use an outside-the-root test folder to judge whether the Arr integration works. Test Arr synchronization later with a backed-up movie that Radarr/Sonarr actually manages.
Note
The screenshot below is one of my actual libraries, and I turned off the Process Library switch initially, during preparation.
Step 5: Build the flow - H.264 only, not everything
I started with a community HEVC flow and modified it. Initially, the flow checked whether a file was already HEVC. That was too broad: anything not HEVC could end up in the conversion branch, including AV1 or other codecs.
The simpler approach was to turn it around:
If the input video is H.264, continue. Otherwise, stop.
This avoids re-encoding HEVC, AV1, and other formats accidentally.
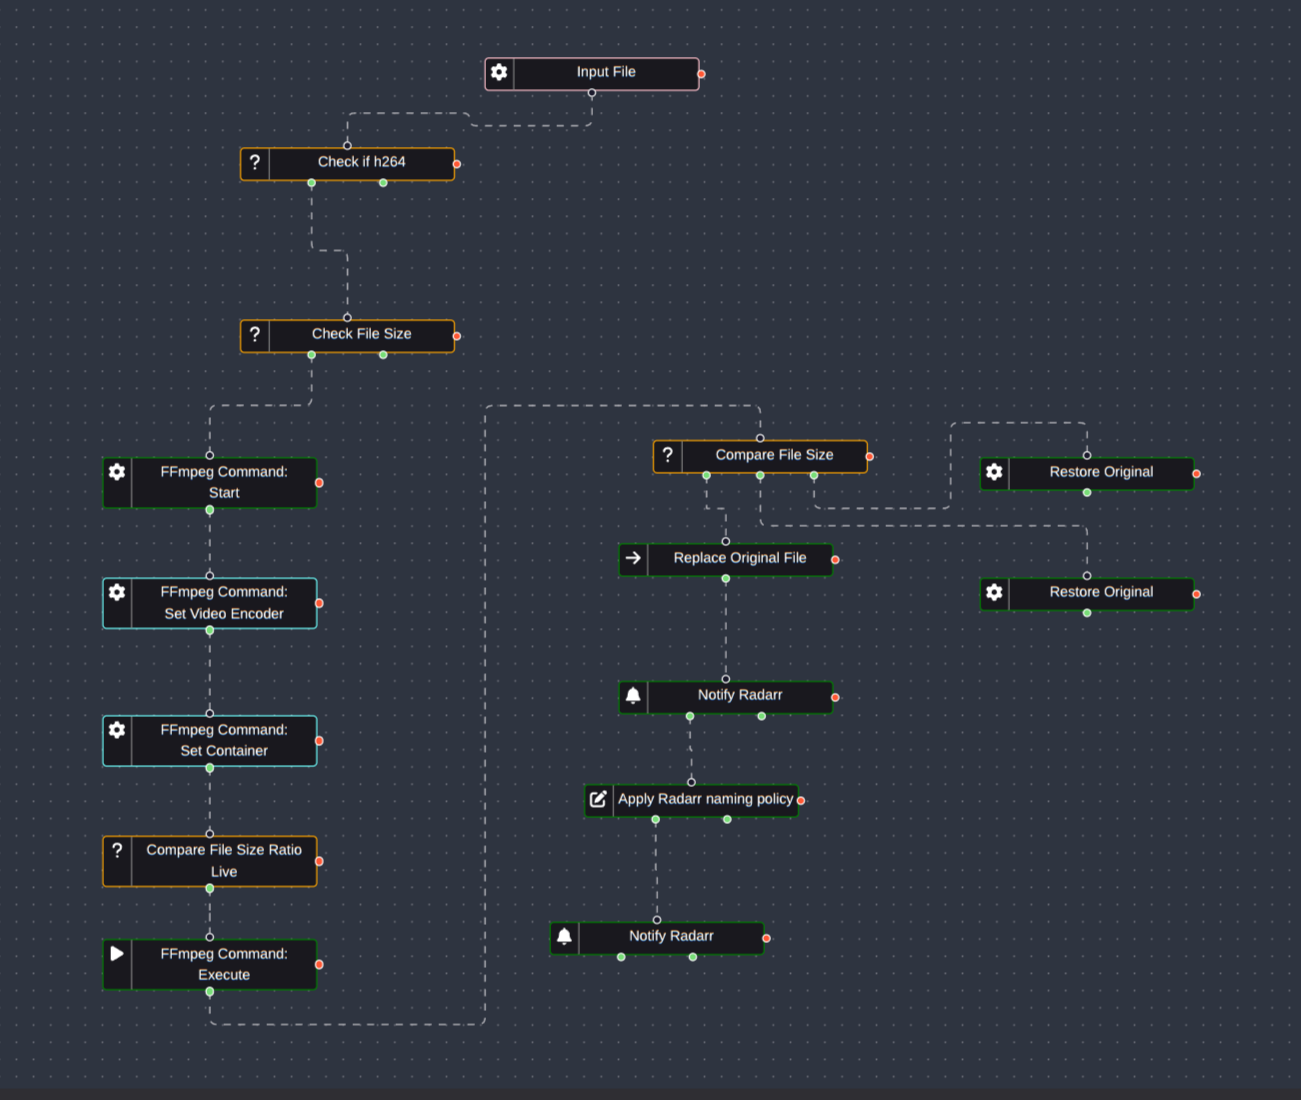
In Flows, create or duplicate a flow and connect these plugins:
Input File
    |
Check if H.264
    |-- NOT H.264 --> End (leave this branch unconnected)
    |
    +-- H.264 --> Require Review
                     |
                  Check File Size (minimum 2 GB)
                     |-- Below threshold --> End
                     |
                     +-- Eligible --> FFmpeg Command: Start
                                        |
                                     FFmpeg Command: Set Video Encoder
                                        |
                                     FFmpeg Command: Set Container
                                        |
                                     FFmpeg Command: Execute
                                        |
                                     Compare File Size
                                        |-- Smaller --> Keep encoded working file
                                        |-- Same/larger --> Select original working file
                                        |
                                     Replace Original File
                                        |
                                     Notify Radarr/Sonarr
                                        |
                                     Apply Radarr/Sonarr Naming Policy
                                        |
                                     Notify Radarr/Sonarr again
The diagram describes the decision logic. In the actual Flow editor, check the labeled outputs on each plugin.
A few things here deserve their own explanation.
Require Review goes before encoding
I wanted to approve each movie before spending GPU time on it. The Require Review plugin pauses the flow and puts the file in Tdarr’s staging area until you review it. The screenshot does not show the review step.
Turn Auto accept successful transcodes off if you want this gate to work. If auto-accept is on, Tdarr’s documentation says the review plugin is skipped.
This is a learning-phase control, not something everyone needs. When I’m happy with the results, I can remove the gate and let the backlog run on its own.
Skip small files
I set Check File Size to process files above 2 GB. Files below that threshold aren’t worth the encoding time for my current goal. That’s a personal choice, not a universal HEVC rule.
The plugin has a within range output and an outside range output. Connect only the eligible branch to FFmpeg. Check how the plugin treats an exact boundary value if that matters to you.
Configure NVENC and NVDEC
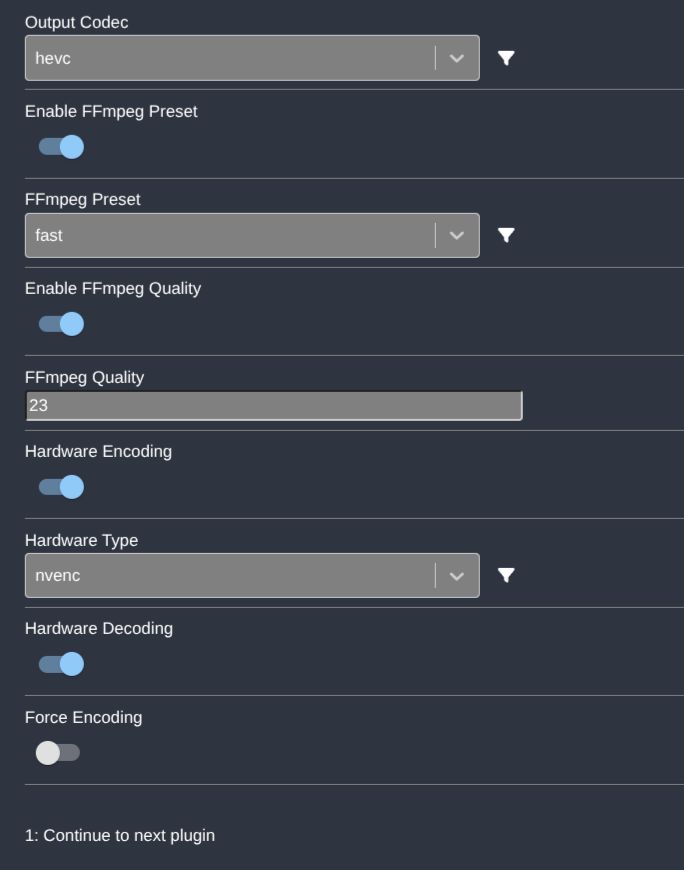
In FFmpeg Command: Set Video Encoder, my working settings are:
| Option | Value |
|---|---|
| Output video codec | hevc |
| Hardware encoding | On |
| Hardware type | nvenc |
| Hardware decoding | On |
| Quality | 23 |
| Preset | Fast (generated p4 in my test) |
| Force encoding | Off |
I use the FFmpeg Command: Set Container step to keep the output container appropriate for the source; inspect its settings rather than blindly changing all files to MP4 or MKV. In my tested MKV jobs, the existing audio and subtitle streams were copied rather than re-encoded.
QP is not CRF. The actual FFmpeg command in my initial test included -c:0 hevc_nvenc -qp 25 -preset p4. I later changed the quality setting to 23, so the equivalent NVENC setting is QP 23, not software x265’s CRF 23. A lower QP generally favors quality and tends to increase size. Use it as a starting point and inspect the output.
Keep the original if the new file isn’t smaller
This is my favorite safeguard in the flow.
The Compare File Size plugin has three outputs:
- Working file is smaller than the original.
- Working file is the same size.
- Working file is larger.
I route the smaller branch to keep the encoded working file. The same-size and larger branches select the original as the working file, so the conversion is discarded rather than replacing the movie with something that uses more space.
The screenshot shows my Set Working File branches. In my current flow, both outcomes eventually reach the replacement and notification sequence; on a rejected conversion, the original is selected as the working file instead. If you copy this idea, double-check that the original is selected on the rejected branches and that the final replacement step does not delete or overwrite it. Test this behavior before running it across your entire library.
This gate measures storage efficiency, not visual quality. A smaller file can still look worse, which is why I did manual playback checks too.
Step 6: Make Radarr and Sonarr recognize the converted movie
This took some experimenting. The important thing is that Tdarr can change the file on disk, but Radarr and Sonarr still need to refresh their records and apply their own naming rules.
I created separate flows:
- Movies: HEVC NVENC + Radarr integration
- TV: HEVC NVENC + Sonarr integration
And separate libraries:
| Library | Tdarr source | Integration |
|---|---|---|
| Movies | /mnt/nas-media/media/movies |
Radarr |
| TV | /mnt/nas-media/media/tv |
Sonarr |
| Test | /mnt/nas-media/ff_test |
Encoding tests only |
My TV library is created but still paused while I work through the movie backlog.
After Replace Original File, the successful movie path is:
Notify Radarr
    |
Apply Radarr or Sonarr naming policy (set to Radarr)
    |
Notify Radarr again
The naming-policy plugin documentation specifically recommends notifying the Arr app before and after applying the naming policy. The Notify plugin waits for the refresh scan to complete.
Each plugin needs:
- The application type: Radarr or Sonarr.
- Its API URL, reachable from the Tdarr VM.
- Its API key, from that application’s settings.
No extra path field was required in those plugins. The paths used by Docker and Tdarr were different, but once I tested files inside Radarr’s real movie root, the integration worked in my setup.
In Radarr, I already had these enabled under Settings → Media Management → Show Advanced:
- Rename Movies: On
- Analyze video files: On
- Rescan Movie Folder after Refresh: Always
I also use a filename format that includes the detected video codec. After conversion, Radarr can update the filename from AVC/H.264 to HEVC when the naming policy is applied.
The quirk was the external subtitle files. In my first test folder, the movie could be renamed, but the external subtitle didn’t follow. Once I ran the production movie flow inside Radarr’s registered library, Radarr updated the filenames and the attached external subtitle files correctly in my tests. More than 20 movies had been processed when I checked.
That is an observed result from my setup, not a guarantee for every subtitle naming scheme or every Arr version. Verify one movie with an external .srt before running a big batch.
Step 7: Verify that the GPU is actually doing the work
This was one of my biggest gotchas.
At first, Tdarr was using NVENC for encoding, but the CPU was still doing decoding. The result was a busy CPU even though the GPU encoder was working.
I checked the running FFmpeg process:
ps -eo pid,comm,%cpu,%mem,args --sort=-%cpu | head -12The initial FFmpeg process used around 257% CPU in ps (roughly 2.57 logical cores). The command included hevc_nvenc, but did not request GPU decoding.
Then I watched NVIDIA’s encoder and decoder activity:
nvidia-smi dmon -s u -d 2Initially the readings were roughly:
enc  99-100%
dec       0%
I enabled Hardware Decoding in the Tdarr encoder plugin and waited for the next job. You cannot change the FFmpeg command of a job that’s already running.
After the new job started:
enc  100%
dec  47-57%
The reported CPU load fell to around 30% on the measurement I was watching. That is a substantial improvement from the earlier software-decoding run, although the two CPU percentages should only be compared directly if measured on the same scale.
The lesson is simple: NVENC encoding and NVDEC decoding are separate settings. Just seeing hevc_nvenc in a command does not mean the GPU is decoding too.
Step 8: Check the result on a real playback device
One early test movie, A Beautiful Mind (2001), went from approximately 9.19 GB to 2.70 GB, a reduction of about 70.6%. That encode took roughly 13 minutes in the initial setup.
I checked the resulting MKV with ffprobe. The video changed from H.264 to HEVC while the E-AC3 5.1 audio and SubRip subtitle streams remained present:
ffprobe -v error \
  -show_entries stream=index,codec_name,codec_type,channels \
  -of compact "movie.mkv"
Note
I also watched the result on the 4K television for several minutes. I couldn’t spot an obvious difference in normal playback. Other test movies also produced substantial size reductions, sometimes around half, with output that looked very close to the source to me.
That is not a scientific “98% quality” measurement. I didn’t run a VMAF or SSIM comparison, and I wouldn’t put a made-up quality percentage on it. Your eyes, screen, source, and tolerance for artifacts may be different.
Plex Web can also behave differently from the Apple TV client. Chrome sometimes caused Plex to transcode HEVC Main10 to H.264, while the Apple TV 4K is the main playback target. I left Plex hardware transcoding enabled rather than trying to disable it globally.
I even tested Plex Web transcoding while Tdarr was running. Both continued without buffering or obvious problems. That’s reassuring for my mostly single-stream home use. I think for single stream and single encoding it is fine, but I am pretty sure if multiple people use Plex, it might be different or even struggle.
Step 9: Make it a background maintenance job
The big workload is the first pass through the existing H.264 library. After that, Tdarr mostly waits for new files that Sonarr or Radarr imports.
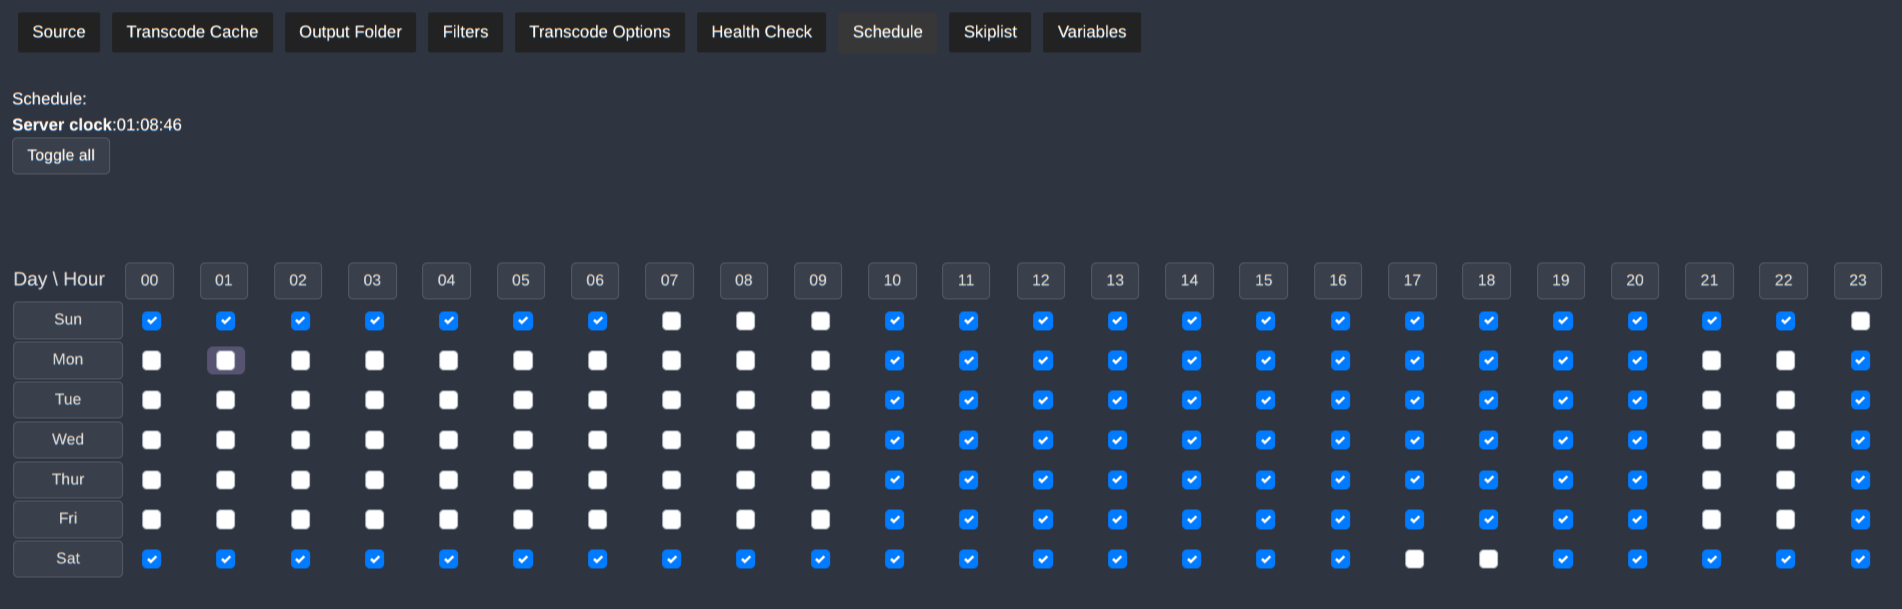
My plan is to use each Tdarr library’s built-in Schedule tab rather than writing another cron script. The weekday window will be 10 AM to 6 PM, local Malaysia time (even though the screenshot shows differently, below). During weekends, pve-node01 stays on, so longer batches are possible.
At the time of writing, I have not enabled those library schedules yet. The movie library is running, and the TV library remains paused. Don’t mistake the planned schedule for something I’ve already tested.
There is also an overnight sleep routine for pve-node01 and the NAS on weekdays. Before using the schedule unattended, I still need to confirm what Tdarr does with a job already running when a schedule window closes. A schedule that prevents new jobs is not necessarily a safe way to stop an active FFmpeg process.
For my NAS-backed libraries, the discovery settings are deliberately boring:
| Setting | My choice |
|---|---|
| Scan on Start | On |
| Hourly Scan | On |
| Folder Watch | Off |
| Hold Files After Scanning | On, 60 minutes |
| GPU workers | 1 |
This is enough for a media library that doesn’t need instant processing. It also avoids depending on file-change events from an NFS share.
Common mistakes and gotchas I made
Starting with the wrong codec check. Checking “not HEVC” is not the same as checking “H.264.” My final flow converts H.264 only. HEVC, AV1, and other codecs exit without encoding.
Letting the flow reach Replace Original File for skipped files. If a file doesn’t need conversion, I don’t want it entering replacement or Arr notification steps. Leave the skip branch unconnected.
Testing Radarr updates outside Radarr’s root. The ff_test directory was useful for encoding tests but not for validating Radarr’s managed-file behavior.
Assuming NVENC means zero CPU. It doesn’t. Hardware decoding was initially off. NVDEC made the real difference to CPU use.
Confusing QP with CRF. My NVIDIA command uses -qp, not software x265 -crf. I settled on QP 23 for now, but that’s a preference, not a magic number.
Thinking a smaller file must be better. The size comparison only answers whether I saved space. I still check the picture, audio, and subtitles.
Ignoring subtitle sidecars. Embedded subtitles and external .srt files are different things. The production Radarr integration handled my external subtitle filenames; the isolated test directory did not.
Running too many workers. One GPU worker is enough for my Quadro P1000 and shared Plex setup. More workers do not automatically mean more useful throughput.
Assuming a schedule stops running jobs safely. That behavior still needs verification before I trust the weekday sleep routine.
What about old AVI, MPEG-4, and audio tracks?
I found older AVI and MPEG-4-era files while checking the library. Those are a separate job. AVI and MP4 are containers, not necessarily the video codecs inside them. I plan to inspect the actual codecs first, then build a separate flow if converting them makes sense.
I have also seen movies with six or seven audio languages, DTS, Dolby formats, and other tracks. I am not stripping or recompressing them yet. Saving a bit more space isn’t worth accidentally removing a language track or breaking playback. Audio optimization can wait.
Where I ended up
After more than 20 production movie conversions, the part I cared about was working:
- Tdarr converted selected H.264 movies to HEVC using the Quadro P1000.
- NVDEC brought CPU usage down substantially compared with software decoding.
- The size gate kept the original when the output wasn’t smaller.
- Radarr refreshed its records, applied the new codec-aware filenames, and handled the external subtitle sidecars in my tested movies.
- Plex continued to work while Tdarr encoded in the background.
There are still things I may adjust later: review automation, weekday schedules, the TV backlog, older codecs, and perhaps audio. But none of those need to be solved before this workflow is useful.
If your goal is to save storage space by converting an existing H.264 library to HEVC using an NVIDIA GPU, this is the path I would start with: one worker, a small test library, hardware decoding and encoding, a size check, and an Arr refresh after the file-handling step. You can further refine the flow later so rejected conversions bypass unnecessary notifications.
Don’t make it more complicated than it needs to be. I know there are options for Docker-based deployment, but since the GPU already exclusively passed through the Ubuntu VM. I did not go in the direction of poking around a working system.
Comments