
The Elgato Wave:3 works surprisingly well on Linux as a normal USB microphone. The problem is that the microphone is only half of what makes the Wave setup useful on Windows.
The other half is the Wave Link app.
On Windows, Elgato gives you microphone processing, VST effects, routing, noise reduction, and separate virtual devices.
On Linux, you can plug the Wave:3 in and record from it, but there is no official Wave Link application waiting for you, nor will there be any.
I initially assumed that meant I would have to live with the raw microphone input.
It turns out that I do have options to build the microphone FX chain.
With PipeWire, WirePlumber, and EasyEffects, you can build a microphone processing chain and expose the processed result as a separate virtual microphone. Applications such as OBS, browsers, Discord, or recording software can then use that processed source instead of the raw Wave:3 input.
The setup looks roughly like this:
flowchart TB    A["🎙️ Elgato Wave:3"]    B["🔊 PipeWire"]    C["🧭 WirePlumber"]    D["🎛️ EasyEffects"]
    A --> B --> C --> D
    D --> E["✨ Processing Chain<br/>Noise reduction<br/>Equalizer<br/>Compressor"]
    E --> F["🎤 EasyEffects Source"]
    F --> G["🎥 OBS"]    F --> H["🌐 Browser"]    F --> I["🖥️ +Others"]
This is not a replacement for every feature inside Wave Link. But for the part I actually cared about - making the microphone sound cleaner and exposing the processed voice as another input device - it works very well.
What I was trying to solve
The Wave:3 itself already worked under Linux.
There was no special Elgato driver involved. PipeWire detected it as a USB audio device and applications could use it directly.
The problem was that the input was completely raw:
Wave:3 → application- No noise suppression.
- No EQ.
- No compressor.
- No voice cleanup.
What I wanted was:
Wave:3 ↓audio processing ↓virtual microphone ↓applicationThat is essentially the useful part of the MicrophoneFX workflow you get from Wave Link on Windows.
EasyEffects turned out to be a very good fit for this.
The important Linux audio pieces
There are three components worth understanding before changing anything.
PipeWire
PipeWire is doing the actual audio routing.
It handles the audio devices, streams, and connections between applications.
WirePlumber
WirePlumber is the PipeWire session and policy manager.
This caught me out briefly on NixOS because I had not explicitly enabled WirePlumber in my configuration, yet the service was running anyway.
My configuration contained:
services.pipewire = {  enable = true;  alsa.enable = true;  alsa.support32Bit = true;  pulse.enable = true;
  # Use the WirePlumber session manager  # wireplumber.enable = true;};
The important point is this:
Not explicitly enabling WirePlumber does not necessarily mean WirePlumber is disabled.
On my NixOS Plasma installation, WirePlumber was already running as part of the working PipeWire stack.
This matters when applying the same setup to Fedora, Ubuntu, Mint, Zorin, CachyOS, or another distribution.
Do not disable WirePlumber just because EasyEffects is doing the processing.
EasyEffects does not replace WirePlumber.
WirePlumber is still responsible for policy and management of the PipeWire graph. Arch Linux also describes WirePlumber as the recommended PipeWire session manager.
EasyEffects
EasyEffects sits on top of PipeWire and processes the audio stream.
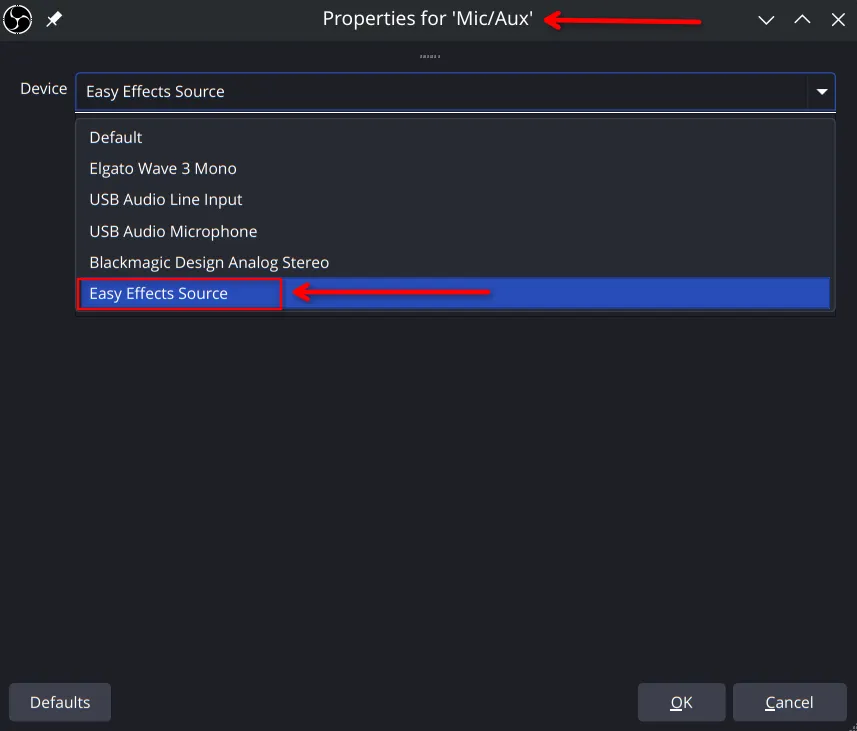
For microphone use, it creates a virtual source typically shown as:
Easy Effects SourceThat becomes the microphone you select inside applications.
Here is OBS and Easy Effects Source as a microphone.
EasyEffects supports filters including compressors, limiters, EQ, noise reduction, high-pass filtering, de-essing, and several other processors. Fedora’s package description specifically lists compressors, limiters, high-pass and low-pass filters, and equalization among its PipeWire effects.
The microphone chain I am using
I started simple rather than throwing every available plugin into the chain.
That is usually where Linux audio tutorials become unnecessarily complicated.
The initial chain was:
Wave:3 ↓Noise Reduction ↓Compressor ↓Limiter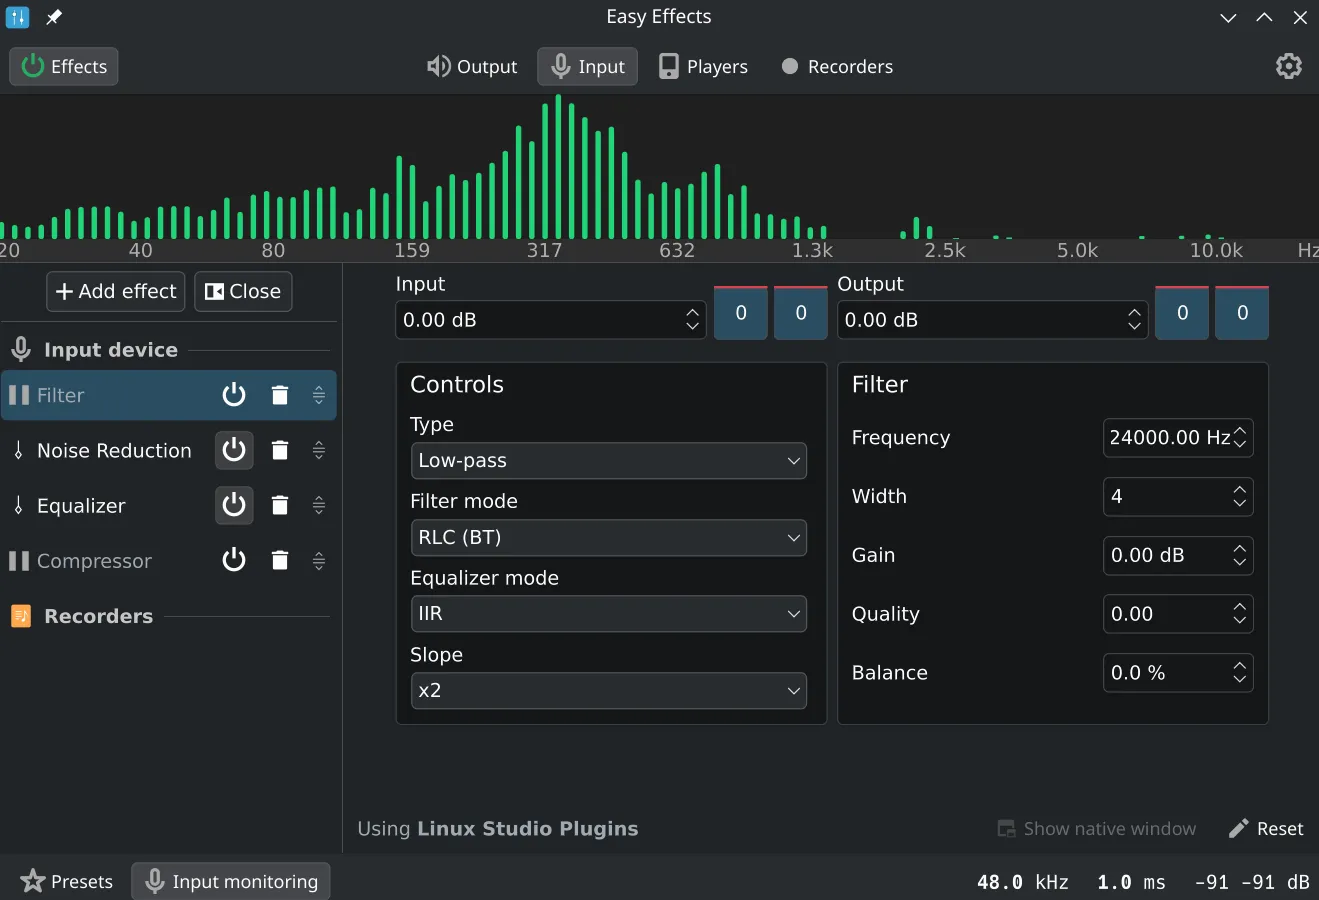
Once that worked properly, I expanded it.
A more complete voice chain looks like this:
Wave:3 ↓High-pass Filter ↓Noise Reduction ↓Equalizer ↓Compressor ↓De-esser ↓Limiter ↓Easy Effects SourceThe order is intentional.
High-pass filter
This removes low-frequency noise that is not useful for normal speech.
That can include:
- desk vibration
- air-conditioning rumble
- low-frequency room noise
A starting point somewhere around 70–80 Hz is reasonable for speech.
Do not push this too high unless you actually want your voice to sound thinner.
Noise reduction
EasyEffects includes RNNoise-based noise reduction.
This helps with persistent background noise such as:
- PC fans
- air-conditioning
- general room noise
I would avoid aggressive settings at first.
Overdone noise reduction creates that familiar processed, underwater voice that somehow manages to sound worse than the fan it removed.
Equalizer
EQ is where you can shape the microphone for clarity.
The goal here is not to create a radio-announcer caricature. The Wave:3 already sounds decent.
Small changes are usually enough.
Compressor
Compression reduces the difference between quieter and louder speech.
For normal calls and recording, this is probably one of the most useful parts of the chain because it gives the microphone a more consistent level.
De-esser
This reduces harsh S sounds.
Again, subtle is better.
Limiter
The limiter is the last safety net.
I keep it at the end of the chain so unexpected peaks do not clip the virtual microphone output.
NixOS setup
This is the configuration I am currently using.
In configuration.nix:
# Enable sound with PipeWire.services.pulseaudio.enable = false;security.rtkit.enable = true;
services.pipewire = {  enable = true;  alsa.enable = true;  alsa.support32Bit = true;  pulse.enable = true;
  # JACK is optional.  # jack.enable = true;
  # WirePlumber is already provided by the working PipeWire setup  # on this system, so I did not explicitly enable it here.  # wireplumber.enable = true;};
The comment above is important.
I initially noticed that wireplumber.enable was commented out and thought WirePlumber was not active.
Checking the actual user service showed otherwise:
systemctl --user status wireplumberWirePlumber was running.
That is a better test than reading one configuration line and assuming what the runtime state must be.
For the packages, I added EasyEffects and QPWGraph:
{  environment.systemPackages = with pkgs; [
    # media    # Wave:3 microphone processing and PipeWire routing inspection    easyeffects    qpwgraph    obs-studio-nvenc    vlc
  ];}
Then rebuild normally:
sudo nixos-rebuild switchFedora KDE Plasma
Fedora already has a mature PipeWire setup, so there should be very little to change at the audio-server level.
EasyEffects is available directly from Fedora’s repositories.
Install it with:
sudo dnf install easyeffectsFor graphical PipeWire inspection, QPWGraph is also useful:
sudo dnf install qpwgraphBefore doing anything else, verify the user services:
systemctl --user is-active pipewire pipewire-pulse wireplumberExpected:
activeactiveactiveYou can also inspect the devices with:
wpctl status -nThe Wave:3 should appear as an input/source.
I would not replace or manually disable Fedora’s existing PipeWire or WirePlumber configuration for this setup. EasyEffects is designed specifically for PipeWire applications, and Fedora ships it as such.
Ubuntu, Linux Mint, Zorin OS and similar distributions
For current Ubuntu-based distributions using PipeWire, the approach is basically the same.
First check what is actually running:
systemctl --user is-active pipewire pipewire-pulse wireplumberThen:
pactl infoYou want to see something similar to:
Server Name: PulseAudio (on PipeWire ...)That does not mean the system is running the old PulseAudio server.
pipewire-pulse provides the PulseAudio-compatible interface so existing applications can continue to work.
Ubuntu 24.04 includes EasyEffects in its repositories.
Install:
sudo apt updatesudo apt install easyeffectsIf available in the distribution repository:
sudo apt install qpwgraphThen open EasyEffects and configure the microphone under the Input section.
Do not disable WirePlumber
This deserves its own section because it is very easy to misunderstand.
Do not do this:
systemctl --user disable --now wireplumberWirePlumber is not competing with EasyEffects.
The roles are different:
PipeWire │ ├── WirePlumber │ manages devices/routing policy │ └── EasyEffects processes audioRemoving the session manager can leave you with a much more interesting Linux audio debugging session that you definitely do not want to spend time on.
CachyOS
CachyOS is Arch-based, so the similar PipeWire model applies.
EasyEffects is in the normal Arch extra repository. The current Arch package also brings in RNNoise, WebRTC audio processing, SpeexDSP, and other processing dependencies, with additional LV2 plugins available optionally.
Install:
sudo pacman -S easyeffects qpwgraphThen verify:
systemctl --user is-active pipewire pipewire-pulse wireplumberWirePlumber is the recommended PipeWire session manager on Arch, and current Arch packages depend on the PipeWire session-manager infrastructure.
Again, there should be no reason to dismantle CachyOS’s working audio stack.
Install EasyEffects on top of it.
Configure EasyEffects
Open EasyEffects and select:
Input
not Output.
Then click:
Add effect
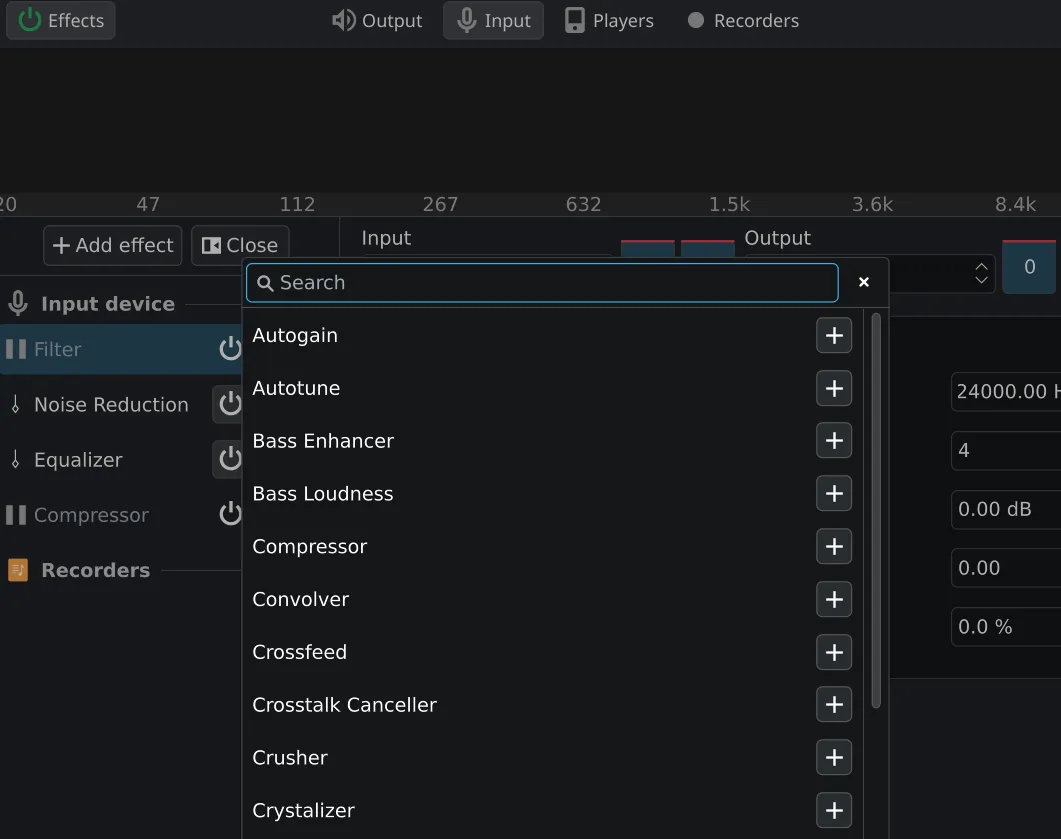
And build the processing chain.
For a simple starting configuration:
Noise ReductionCompressorLimiterOnce that is stable:
FilterNoise ReductionEqualizerCompressorDe-esserLimiterEffects are processed in sequence, so order matters.
You can rearrange them later without rebuilding the entire setup.
Select the processed microphone
This is the part that makes the whole thing useful.
Without EasyEffects, an application sees something like:
Elgato Wave:3After EasyEffects is running, there should also be:
Easy Effects SourceUse:
Easy Effects Sourceinside OBS, Discord, Chrome, Firefox, Zoom, or another recording application.
Do not select the raw Wave:3 if you want the effects.
That gives you two useful choices:
Elgato Wave:3    raw microphone
Easy Effects Source    processed microphone
That separation is the part that makes this feel much closer to the Windows Wave Link workflow.
QPWGraph is useful when something looks wrong
Linux audio becomes much easier to understand when you can actually see the connections.
That is why I installed QPWGraph alongside EasyEffects.
Instead of guessing what is connected to what, QPWGraph lets you inspect the PipeWire graph visually.
Conceptually, you should see something similar to:
Wave:3 │ ▼EasyEffects │ ▼Easy Effects Source │ ▼ApplicationIf the microphone is working raw but not through EasyEffects, this graph is one of the first places I would look.
Useful verification commands
These commands work across most modern PipeWire distributions:
wpctl status -nCheck the PipeWire graph:
pw-link -lCheck the three important user services:
systemctl --user is-active pipewire pipewire-pulse wireplumberAnd check the PulseAudio compatibility layer:
pactl infoA healthy PipeWire setup usually reports:
PulseAudio (on PipeWire ...)I would not complicate things
There are several much more elaborate ways to accomplish this.
- You can create custom PipeWire filter chains.
- You can use JACK.
- You can route everything through Carla.
- You can build chains from individual LV2 plugins.
All of those are valid and possible.
I just do not think they are the right starting point for this problem.
If the requirement is:
Make the Wave:3 sound better and expose that processed signal as another microphone.
then:
PipeWire + WirePlumber + EasyEffectsAlready solved it.
Adding another three layers because Linux lets you is not automatically an improvement.
What this does not replace
This setup does not reproduce the entire Elgato Wave Link application.
Wave Link also provides things such as:
- application mixing
- monitor mixes
- stream mixes
- Elgato-specific controls
- VST management
- tighter integration with Elgato hardware
That is a bigger problem.
What this setup replaces surprisingly well is the microphone FX path:
Raw microphone ↓processing ↓virtual processed microphoneFor my use case, that was the missing part.
The gotcha part
The main gotcha was not the Wave:3.
The microphone itself was working normally.
The confusing part was understanding which Linux audio component was actually responsible for what.
On NixOS, I saw this:
# wireplumber.enable = true;and initially thought of it as WirePlumber being disabled.
It was not.
The service was running.
That is why I would always verify runtime state first:
systemctl --user status wireplumberBefore modifying the PipeWire configuration.
Linux audio has accumulated enough history that there are still plenty of old guides telling people to replace PulseAudio, disable things, install JACK, edit PipeWire configuration files, or manually create virtual devices.
For this particular use case, none of that was necessary on my current setup.
Final result
My Linux microphone setup now looks like this:
flowchart TB    A["🎙️ Elgato Wave:3"]    B["🔊 PipeWire"]    C["🧭 WirePlumber"]    D["🎛️ EasyEffects"]
    A --> B --> C --> D
    D --> E["✨ Processing Chain<br/>High-pass filter<br/>Noise reduction<br/>Equalizer<br/>Compressor<br/>De-esser<br/>Limiter"]
    E --> F["🎤 EasyEffects Source"]
    F --> G["🎥 OBS"]    F --> H["🌐 Browser"]    F --> I["🖥️ +Others"]
The Wave:3 remains available as a normal raw microphone at the same time.
That is probably the most useful thing I learned from testing this.
The lack of a Wave Link app on Linux does not mean the Wave:3 has to remain a basic, unprocessed USB microphone.
PipeWire already gives Linux most of the routing infrastructure needed. EasyEffects fills in the processing layer without making it an overcomplicated process.
Shoutout to the Elgato support team for not helping with the Wave 3 (new) app on Windows 11 - the app caused multiple system blue screen crashes, and I have even sent them a core dump with the proof of the Elgato driver being in the center of attention. Instead of debugging, they asked me to do more core dumps. That was a very helpful thing from support; well done, guys.
Comments